|
There is a problem in installing Zoneminder on Ubuntu 19.10 , as there are no official zoneminder eoan ermine versions issued up to now. The other problem is the presently available Zoneminder versions are based on mysql 5.7 , libmysqlclient20 while The Ubuntu 19.10 uses mysql 8 , libmysqlclient21 by default. Therefore dependency issues crop up when you try to install Zoneminder. As mysql-server-8.0 makes some problems, I have decided to use mariadb-server-10.3 . To overcome dependency issues in installing Zoneminder, libmysqlclient20 has to be downloaded and installed manually before installing Zoneminder using GDebi Package Installer Please refer the following link to download libmysqlclient20 for Ubuntu Disco https://www.ubuntuupdates.org/package/core/disco/main/updates/libmysqlclient20 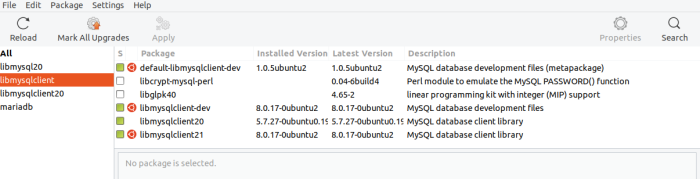 Figure:- 1 installed libmysqlclient20 is shown in the synaptic After installing the deb file libmysqlclient20, Install maridb-server-10.3 using synaptic package manager. Then the installed packages are shown as the following figure 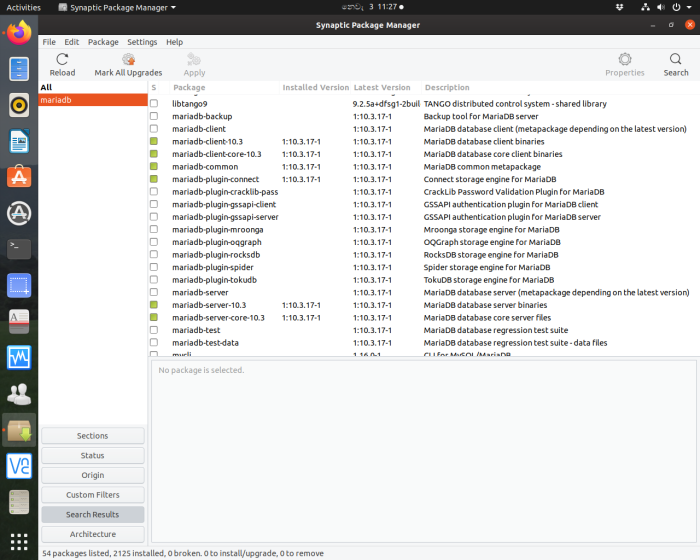 Figure:- 2 installed mairadb packages Mariadb installation Once mariadb-sever installed using the synaptc package manager , the mariadb-sever automatically starts. To check the states you can use one of the following 2 commands on the Ubuntu terminal systemtcl status mysql or systemtcl status mariadb If it is not running try sudo systemtcl start mariadb To enable auto start at boot time , run sudo systemtcl enable mariadb To secure mariadb sever run sudo_mysql_sequre_installation When the script ask you to enter password for root , you can enter your password for the server 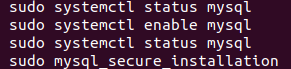 Figure:- 3 As the mariadb sever and the dependency software for zoneminder ,libmysqlclient20 are installed , now it is ready to install zoneminder . I have selected Zonminder master for installation. To install Zoneminder Please refer Connor’s web site Adding PPA to Ubuntu 19.10 (Eoan Ermine) is not possible as there is no official zoneminder version . Therefore the zoneminder deb file of ubuntu disco is downloaded and installed using GDebi Package Installer. Note:- As we have installed libmysqlclient20 , there won’t be dependency issue sudo su rm /etc/mysql/my.cnf cp /etc/mysql/mariadb.conf.d/50-server.cnf /etc/mysql/my.cnf gedit /etc/mysql/my.cnf add the following line below [mysqld] sql_mode = NO_ENGINE_SUBSTITUTION and save the file 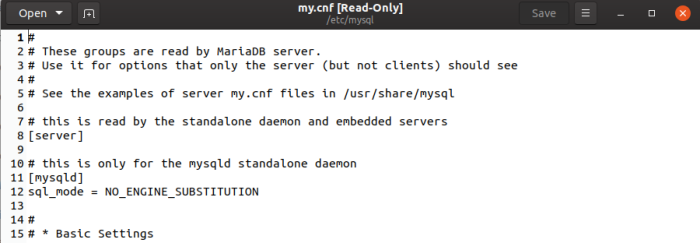 Figure:- 4 systemctl restart mysql mysql -uroot -p < /usr/share/zoneminder/db/zm_create.sql mysql -uroot -p -e "grant all on zm.* to 'zmuser'@localhost identified by 'zmpass';" (In above steps , when ask to enter the pass ,you will have to enter the root password of mysql) mysqladmin -uroot -p reload chmod 740 /etc/zm/zm.conf chown root:www-data /etc/zm/zm.conf adduser www-data video a2enmod cgi a2enconf zoneminder a2enmod rewrite chown -R www-data:www-data /usr/share/zoneminder/ systemctl enable zoneminder service zoneminder start To add timezone to PHP gedit /etc/php/7.3/apache2/php.ini edit line 956 with your timezone 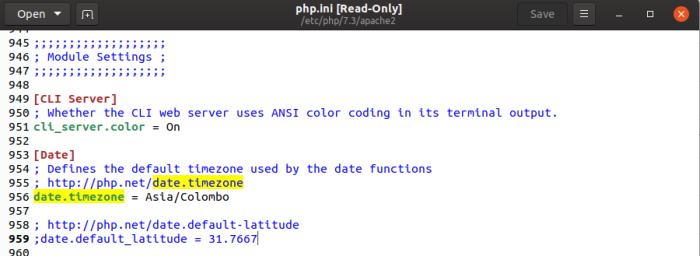 Figure:- 5 php.ini after adding timezone 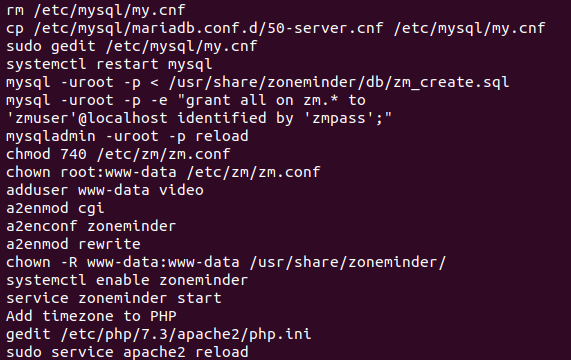 Figure:-6 Then save the file php.ini Your time zone can be get from here Then run on the Ubuntu terminal service apache2 reload Optional …..You can run zonemider without cambozola. Adding cambozola.jar to the directory /usr/share/zoneminder/www/ Download the latest cambozola and extract to the Downloads directory of your PC Then copy the cambozola.jar to the directory /usr/share/zoneminder/www/ On the ubuntu terminal run sudo cp /home/bkjaya1952/Downloads/cambozola-latest/cambozola-0.936/dist/cambozola.jar /usr/share/zoneminder/www/ Open zoneminder web console (http://localhost/zm/) Now you can add your camera to using the ZM-Console Following figures shows the status after adding the USB camera 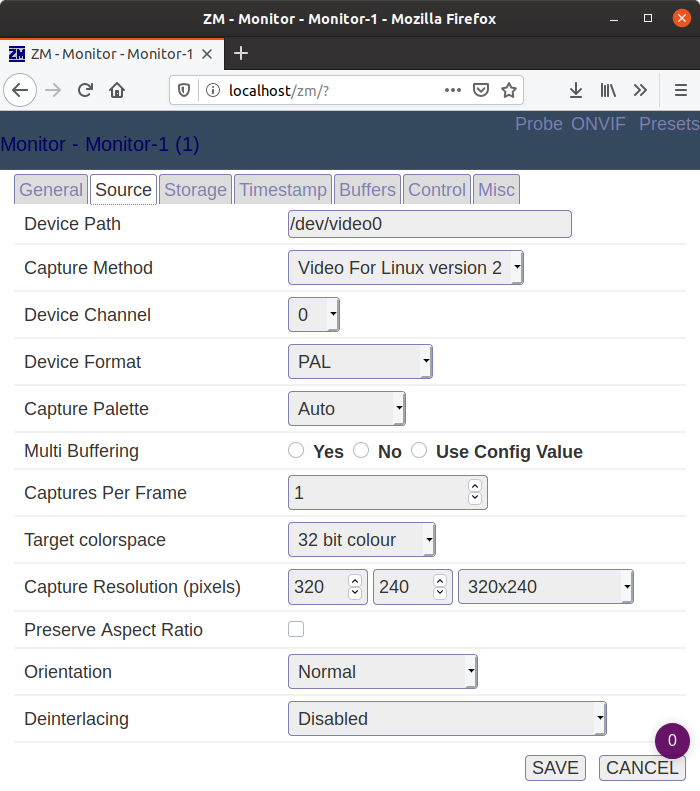 Figure:- 7 Adding usb camera to the monitor 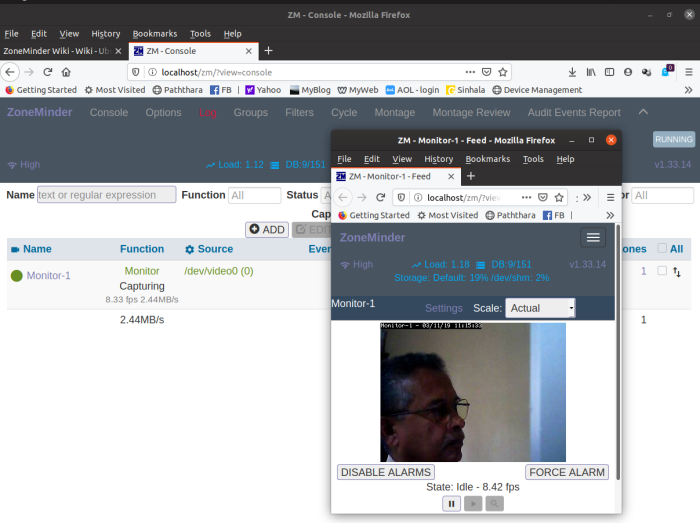 Figure:-8 ZM-Console & ZM-Monitor
To avoid errors pertain to Time , you will have to re enter the TIMEZONE in ZM as follows. In the ZM-Console , go to Options/System/TIMEZONE and select your date.timezone entered in the php.ini file at /etc/php/7.3/apache2/ previously . Then save the setting.
0 Comments
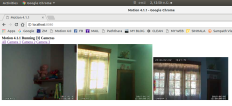
In this tutorial we are going to use “Docker: Enterprise Container Platform” (docker.io) to install “quantumobject/docker-zoneminder” on Ubuntu 18.10 operating system. The “quantumobject/docker-zoneminder which is based on zoneminder master packages has been maintained and uploaded to the Docker Hub by Angel Rodriguez-Rodiguez-Riccrdo. Installation procedure is given below. Installation of Docker on Ubuntu 18.10 Open the Ubuntu terminal and run sudo apt install docker.io We are going to run Zoneminder with MySQL in a separate container On the Ubuntu terminal sudo docker network create net ( I have used my timezone as Asia/Colombo . Your time zone can be get from here )The above commands will pull mysql/mysql-server:5.7 and create a container named “db” on the Docker Platform Then on the Ubuntu terminal sudo docker run -d -e TZ=Asia/Colombo -e MYSQL_USER=zmuser -e MYSQL_PASSWORD=zmpass -e MYSQL_DATABASE=zm -e MYSQL_ROOT_PASSWORD=mysqlpsswd -e MYSQL_ROOT_HOST=% --net net --name db mysql/mysql-server:5.7 sudo docker run -d --shm-size=4096m -e TZ=Asia/Colombo -e ZM_DB_HOST=db --net net --name zm -p 8081:80 --privileged=true quantumobject/docker-zoneminder The above commands will pull quantumobject/docker-zoneminder from the Docker Hub and create a container named “zm” (Here ,I have used port 8080 for the ZM panal ) ( You can notice “- -device=/dev/video0:/dev/video0” in above command which facilitate adding USB cameras on Zoneminder/Docker . You can use “- -privileged=true” also instead of “- -device=/dev/video0:/dev/video0”) In order to appear ZM panel , you will have to start above two containers “db” and “zm” using the terminal as follows. sudo docker start db sudo docker start zm Then open the web browser http://localhost:8080/zm/  Figure: 1 zm console with USB camera and Hikvision wifi IP camera 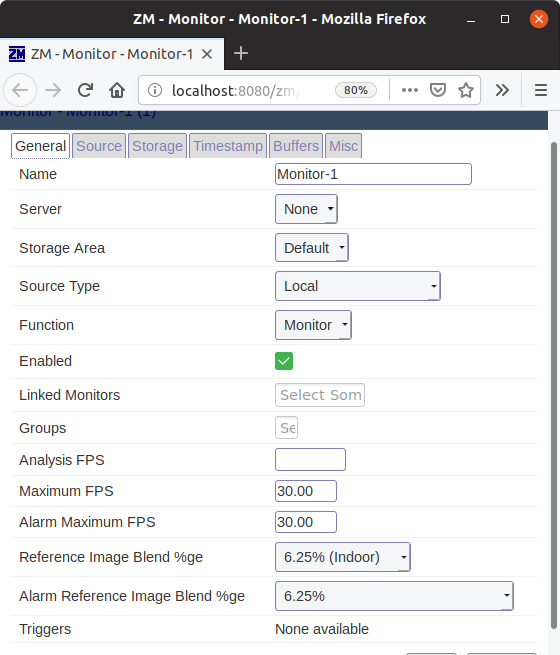 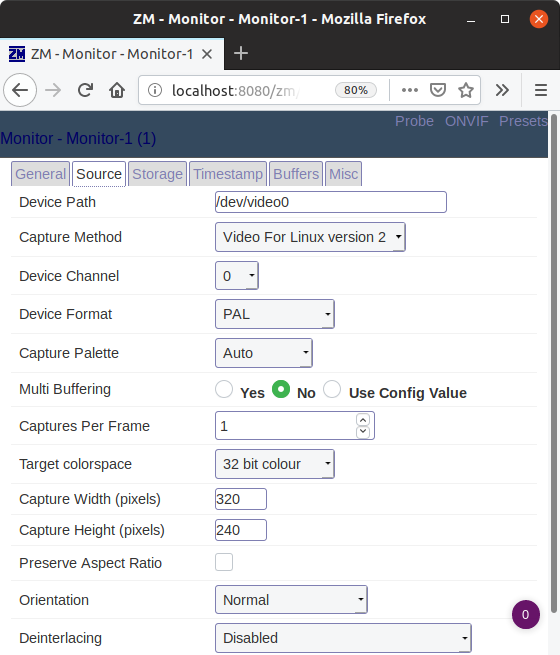 Figure: 2 Creating a monitor for USB camera Please be careful to select correct Capture Width and Height .If you use wrong configuration ,the error log will suggest the correct Width and Height. 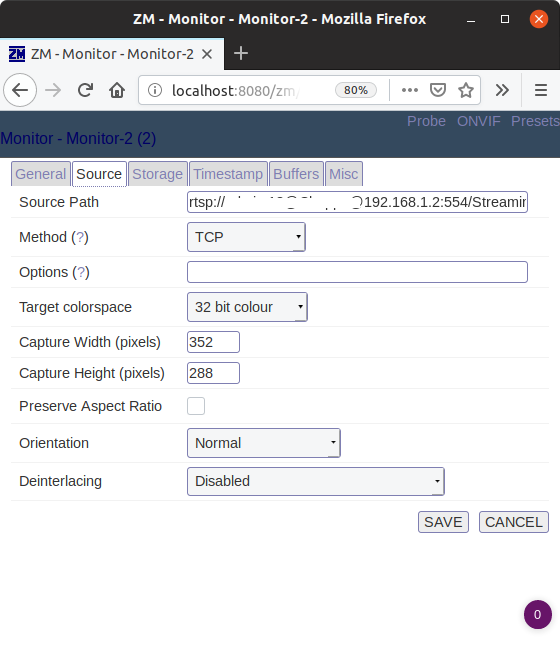 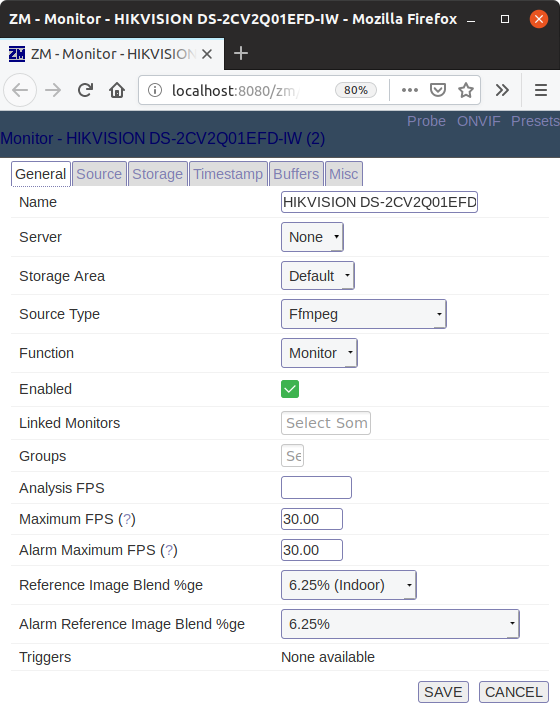 Figure: 3 Creating a monitor for Hikvision wifi IP camera The Camera modal is “Hikvision Q1 Network PT Camera” In zoneminder on Docker , ONVIF button of the monitor menu could not automatically detect the ip camera configuration . Therefor ,I had to enter the source path and Width Height manually. The source path is rtsp://username:password@ip address:554/Streaming/Channels/102?transportmode=mcast&profile=Profile_2 You will have to use your username:password and ip address of your camera Capture width 352 Capture height 288 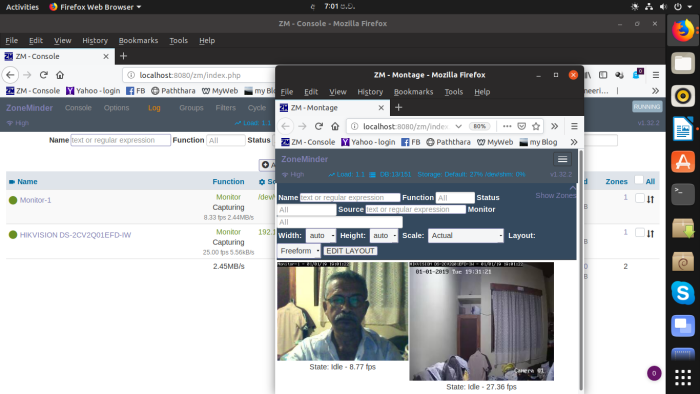 Figure: 4 zm console with USB camera and Hikvision wifi IP camera Following script is used to initiate zoneminder after booting. zmdockerstart.sh file is placed at the home directory . Then on the terminal sudo chmod u+x zmdockerstart.sh  Figure: 5 script to start zoneminder/docker In order to execute the script file zmdockerstart.sh at the boot time. On the terminal sudo crontab -e Then enter the following command at the bottom the opened file and save pressing Ctrl o keys @reboot /home/bkjaya1952/zmdockerstart.sh 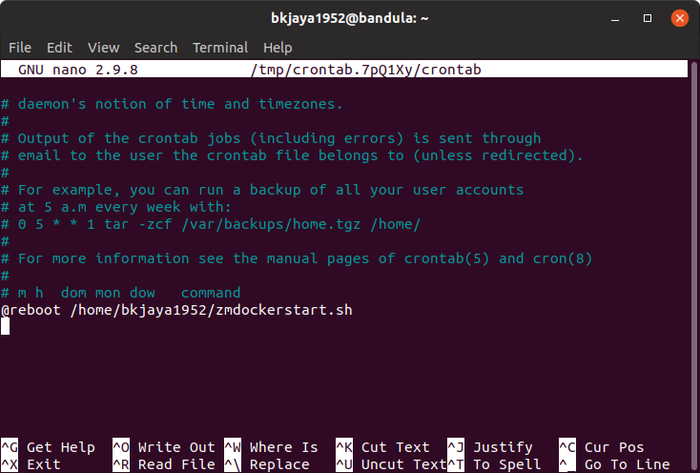 Figure: 6 Setting up the script zmdockerstart.sh with Corn You can see the script will start Zoneminder as root during the start up of Ubuntu cadaver is a command-line WebDAV client for Unix Install cadaver Open the Ubuntu terminal sudo apt-get cadaver After installation if you enter following command on the terminal you will able to access box.com account ( you will have to enter the user and password of the box.com account) sudo cadaver https://dav.box.com/dav 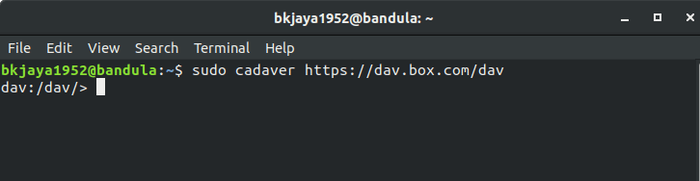 Then enter help to obtain cadaver commands 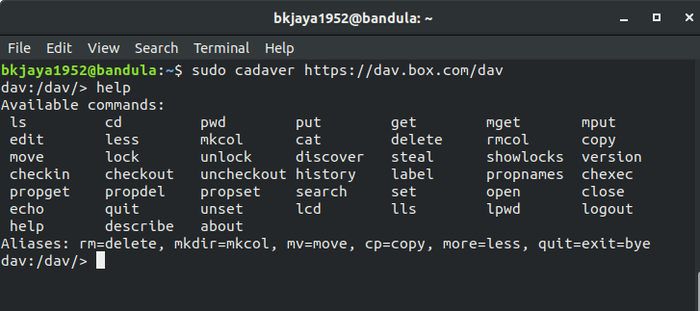 If you enter ls you will be able to see the files and folders in your box.com account 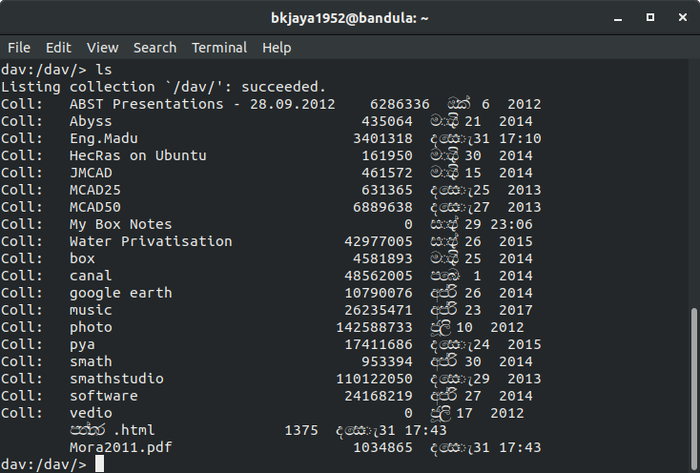 You can upload or download files on box.com account as follows
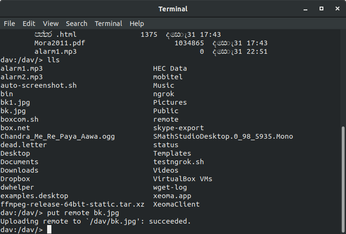
 Uploading a file (bk.jpg) in the home directory of PC to box.com Using lls command you can access file list in the home directory of PC then enter put remote bk.jpg details are in the following figures
Our next target is to make above process automatically
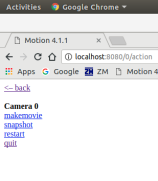
Saving password on netrc sudo gedit ~/.netrc  machine dev.box.com login USERNAME password PASSWORD Here your USERNAME and PASSWORD of the box.com account has to be entered Save file in the home directory of the PC and exit to shell prompt. Make sure, only owner can read the file: $ chmod 0600 ~/.netrc  Making a script file to load box.com sudo gedit boxcom.sh Enter following lines in boxcom.sh file and save it in the home directory of the Ubuntu PC Then using Main Menu software make an executable icon 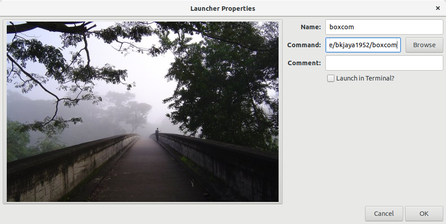 Motion Linux is a highly configurable easy to use cctv software. The CCTV system that is explained here is based on 3 cheap cameras. 2 web cams and one Chines Yoosee IP Camera (wifi) 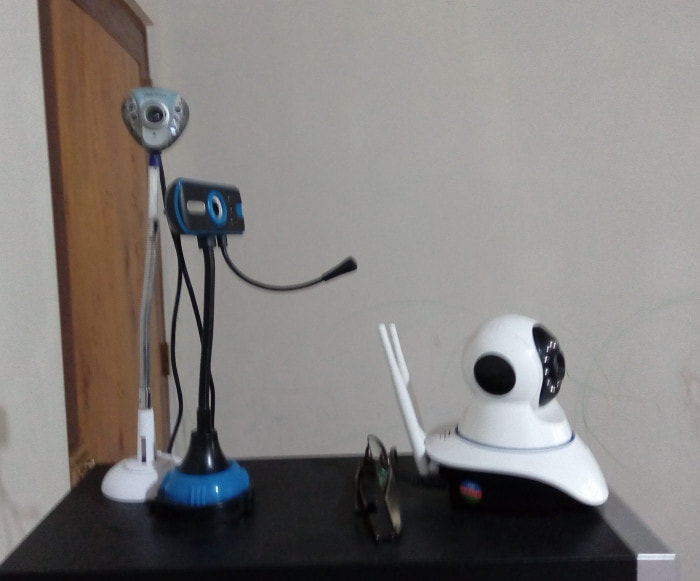 The Motion linux in the Ubuntu software is not the latest version .Therefore it is advisable to get the software from the Motion website First install Motion Linux latest release using the GDebi Package Installer . 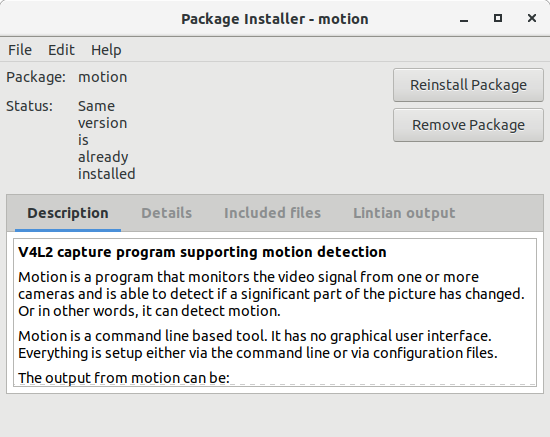 Now if you see the folder motion is being created at /etc/motion/. You can see 5 files in this folder as i the following figure 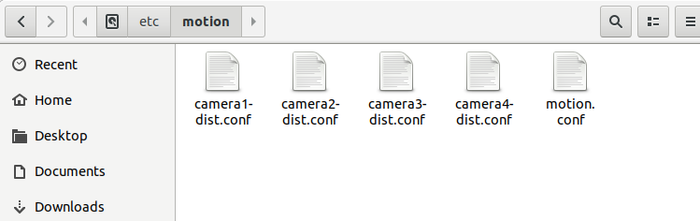 Out of the 5 files shown in the above figure ,the main file is motion.conf Other 4 files are the configuration files of linked cameras If you open the motion.conf file you can see the commands of linking camera are placed at the bottom as follows (728-731). sudo gedit /etc/motion/motion.conf 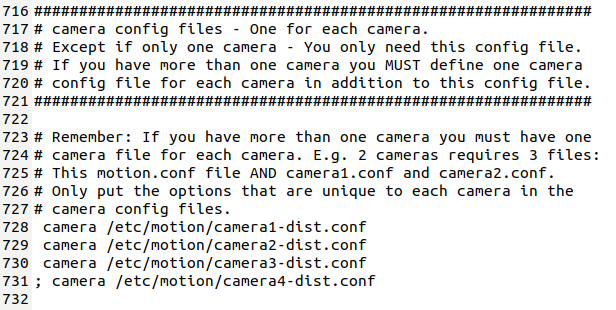 There was an error in the names of camera files in the default installation in the lines 728 to 731. Therefore you will have to correct and save the file as in the above picture. You will have to delete ” ; ” placed at the beginning of the commands in order to activate the corresponding camera .You can see it in 728,729,and 730. Now the corresponding configure files of cameras are edited as follows. Usb camera 1 sudo gedit /etc/motion/camera1-dist.conf 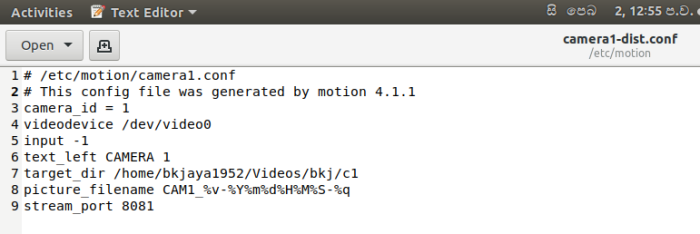 Then save the file Usb camera 2 sudo gedit /etc/motion/camera2-dist.conf 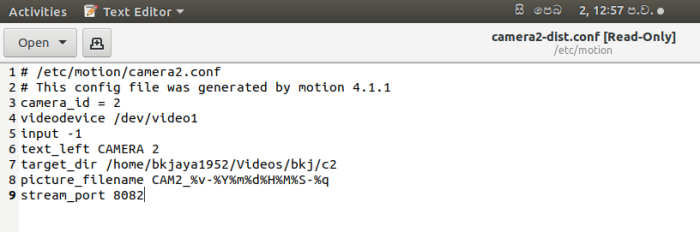 Then save the file IP Camera sudo gedit /etc/motion/camera3-dist.conf 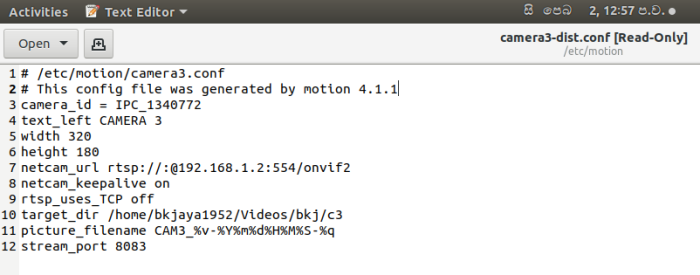 For the netcam_url you will have to enter your camera’s url . To see how to get your url using xeoma please refer this blog here I have created a target directory for videos generated when a motion is detected in my Video directory under the home directory as shown in the above .You can make your directory for videos as your wish .But you have to correctly mentioned path in the configure files. Now you can see the 3 cameras operating in the following figure when you open the Ubuntu terminal and enter the following command to start Motion sudo /usr/bin/motion Then open the web browser and enter the url http://localhost:8080/
In the web panel itself there are facilities provided to start ,restart , stop motion program. The stopping or resuming motion detection also can be done using the web panel . How to add a startup icon for start Motion Please use the Mainmenu program to add an icon as in the following figure 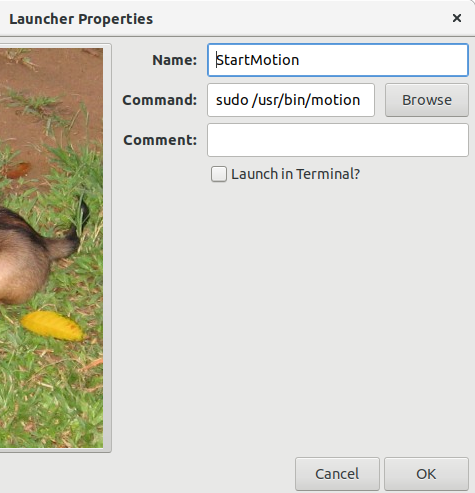 How to upload motion detection videos instantaneously to dropbox cloud using dropbox sync in order to view remotely Make a symlink of the folder of motion detection videos and copy it to the dropbox sync directory in the home page as follows 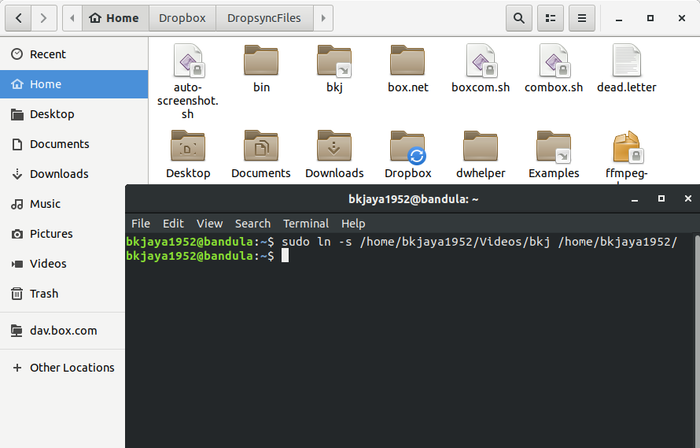 sudo ln -s /home/bkjaya1952/Videos/bkj /home/bkjaya1952/  Now you can copy the symlink folder to the dropbox sync folder  You can see the videos are being uploaded to the dropbox cloud in the above figure How make alarm sounds when a motion is detected First store a alarm sound clip in a folder of your PC Install mplayer software using the Ubuntu software center In my case My-recording-1.wav.wav file has been saved in /home/bkjaya1952/Music Open the terminal and enter sudo gedit /etc/motion/camera2-dist.conf 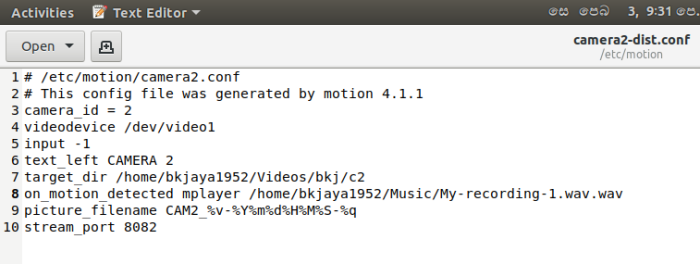 Please enter the following line as shown in the above figure and save the file. on_motion_detected mplayer /home/bkjaya1952/Music/My-recording-1.wav.wav and save the file Now you can hear an alarm sound when a motion is detected by the camera 1 How to record the sound using the camera microphone when a motion is detected The program “arecord” needs to be installed on your system and you need a full working “motion” installation on your system. Following example shows how to record sound using the camera 2 Open the terminal and enter sudo gedit /etc/motion/camera2-dist.conf Then the camera2-dist.conf Edit the file as shown in the figure below 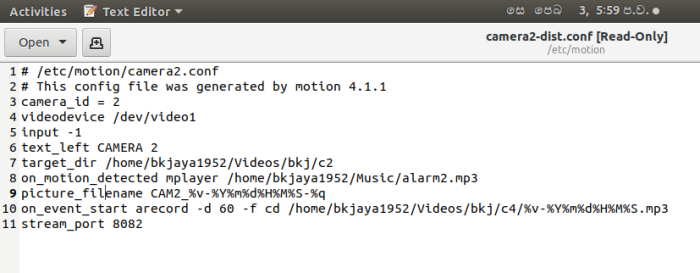 Please see the command line no 10 on_event_start arecord -d 60 -f cd /home/bkjaya1952/Videos/bkj/c4/%v-%Y%m%d%H%M%S.mp3 Here the duration of the recording is limited to 60 seconds (-d 60) in my case as the maximum duration of a motion detection of an alarm event in the main file (motion.conf) is limited to 60 seconds. In my case the recorded sound file is saved at the directory of /home/bkjaya1952/Videos/bkj/c4/ Motion linux is a very useful software in making cctv systems. We must be thankful to the developers of Motion Lunux for providing us a great cctv software free of charge Since viber uses libcurl3 instead of libcurl4 , when installing it on Ubuntu 18.4 some problems arise in keeping Virtualbox and Opera in the same pc (Ubuntu 18.04). The following method can be used to eliminate the above problem In this procedure, you will have to obtain viber rpm version from the official viber web and convert it to a deb file using “alien” command and then install it on Ubuntu 18.04 PC Assuming the viber.rpm file is being downloaded to Downloads folder of the PC. Open the Ubuntu terminal and run following commands cd Downloads Installing alien sudo apt install alien Making a deb file sudo alien –to-deb –scripts viber.rpm After the deb file is formed you can see the file in the Downloads folder as in the following figure  Then install the package sudo dpkg -i viber_7.0.0.1035-3_amd64.deb Now you can see the viber is being installed properly on the pc without harming other software like VirtualBox installed on the same pc How to use a USB Drive as a Dedicated Drive for ZoneMinder, v1.32.2. on Ubuntu 18.04 LTS Computer10/18/2018 This post explains how to use a usb drive attached to a PC to store zoneminder events instead of saving on the computer ( At /var/cache/zoneminder/events). Saving of zoneminder events on a dedicated drive is facilitated on the latest zoneminder versions to avoid the disk of the PC is getting filled with videos and images. To enable to write data of zoneminder to the usb drive , It is necessary to mount the usb drive on a folder of the PC . Please refer the link1 and link2 for further details. For the installation details of Zoneminder please refer my earlier post First insert the usb drive to the computer .Then get the details of USB using the following procedure Format the usb drive to ext4 using gnome-disk-utility Then open the Ubuntu terminal ls -l /dev/disk/by-uuid  figure 1:- Getting details of USB using the Ubuntu terminal ( ls -l /dev/disk/by-uuid ) 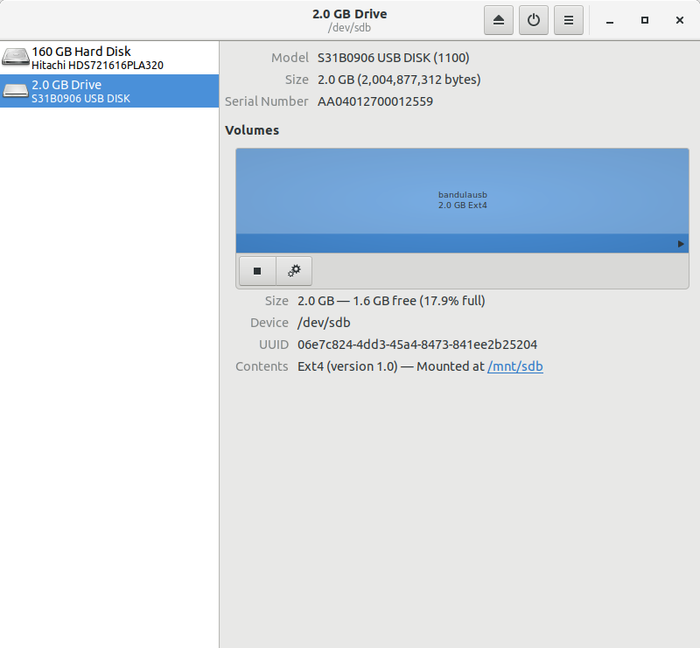 figure 2:- Getting details of USB using gnome-disk-utility Creating Systemd Mount UnitOpen the Ubuntu terminal sudo mkdir /mnt/sdb sudo gedit /etc/systemd/system/mnt-sdb.mount and paste the following codes into mnt-sdb.mount and save (details of uuid of usb was taken from figure 1 and figure 2) 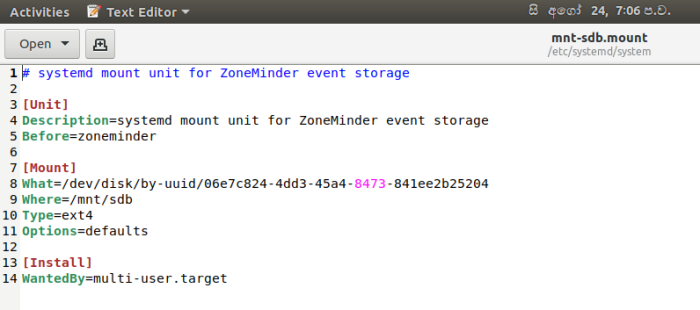 Figure 3:-Codes in mnt-sdb.mount sudo systemctl enable mnt-sdb.mount sudo systemctl start mnt-sdb.mount Then restart the computer Now if you see the folder /mnt/sdb ,you can see that the usb drive is mounted on /mnt Create a folder called “zoneminder” on the mounted usb. Then create folders “events” and “images” with in the folder “zoneminder” Open the ubuntu terminal cd /mnt/sdb mkdir zoneminder cd zoneminder mkdir events mkdir images sudo chown -R www-data:www-data /mnt/sdb/zoneminder sudo chown -R www-data:www-data /mnt/sdb/zoneminder/events
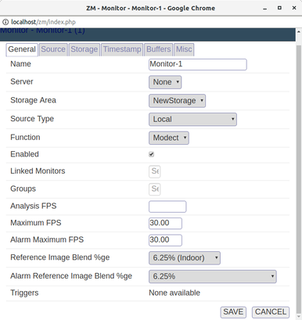
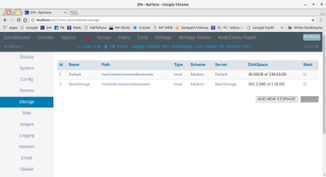
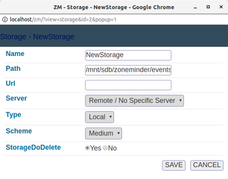
Figure 4:-After setting the owner and group to that of the web server user account Create a config file under /etc/zm/conf.d . Name the file anything you want just as long as it ends in “.conf”. Add the following content to the file and save your changes: (In my case I have used bkj.conf as the file name ) sudo gedit /etc/zm/conf.d/bkj.conf and pasted following codes and saved the file in /etc/zm/conf.d 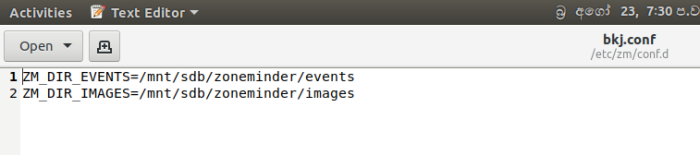 Figure 5:- Open the ZM console and go to Options/Storage and add a NewStorage added Storage path as /mnt/sdb/zoneminder/events Please refer the following figure for the details
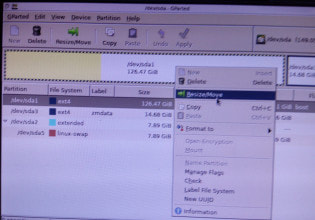
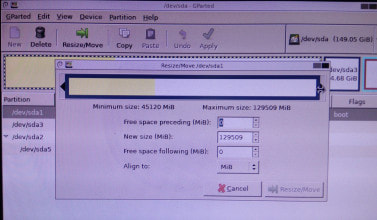
Figure 6:-Creating a New Storage for the Monitor sudo systemctl start zoneminder 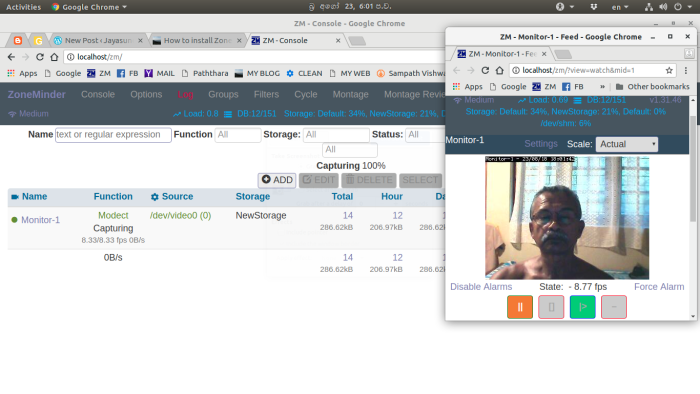 Figure 7:-ZM Console and the monitor 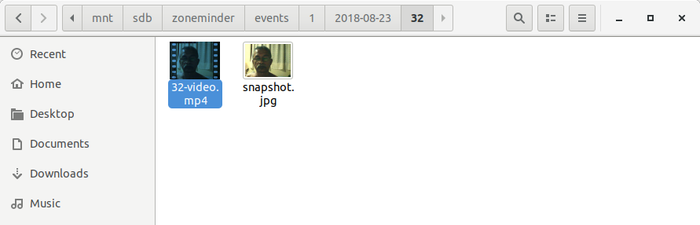 Figure 8:- Saved ZM events on the mounted USB drive Install Zoneminder Please refer Connor's web site Open the terminal and run following commands. sudo add-apt-repository ppa:iconnor/zoneminder-master sudo apt-get update sudo apt install zoneminder sudo su rm /etc/mysql/my.cnf cp /etc/mysql/mysql.conf.d/mysqld.cnf /etc/mysql/my.cnf gedit /etc/mysql/my.cnf add the following line at 32 sql_mode = NO_ENGINE_SUBSTITUTION  systemctl restart mysql Create Zoneminder database in MySQL (Note: this also creates the default Zoneminder user and permissions in MySQL) mysql -uroot -p < /usr/share/zoneminder/db/zm_create.sql mysql -uroot -p -e "grant all on zm.* to 'zmuser'@localhost identified by 'zmpass';" mysqladmin -uroot -p reload chmod 740 /etc/zm/zm.conf chown root:www-data /etc/zm/zm.conf adduser www-data video a2enmod cgi a2enconf zoneminder a2enmod rewrite chown -R www-data:www-data /usr/share/zoneminder/ systemctl enable zoneminder service zoneminder start Add timezone to PHP gedit /etc/php/7.2/apache2/php.ini edit line 939 with your timezone  Then save the file php.ini Your time zone can be get from here Adding cambozola.jar to the directory /usr/share/zoneminder/www/ Download the latest cambozola and extract to the Downloads directory of your PC Then copy the cambozola.jar to the directory /usr/share/zoneminder/www/ On the ubuntu terminal run sudo cp /home/bkjaya1952/Downloads/cambozola-latest/cambozola-0.936/dist/cambozola.jar /usr/share/zoneminder/www/ Open zoneminder web console (http://localhost/zm/) sudo service apache2 reload Then open the ZM-Console and restart zoneminder 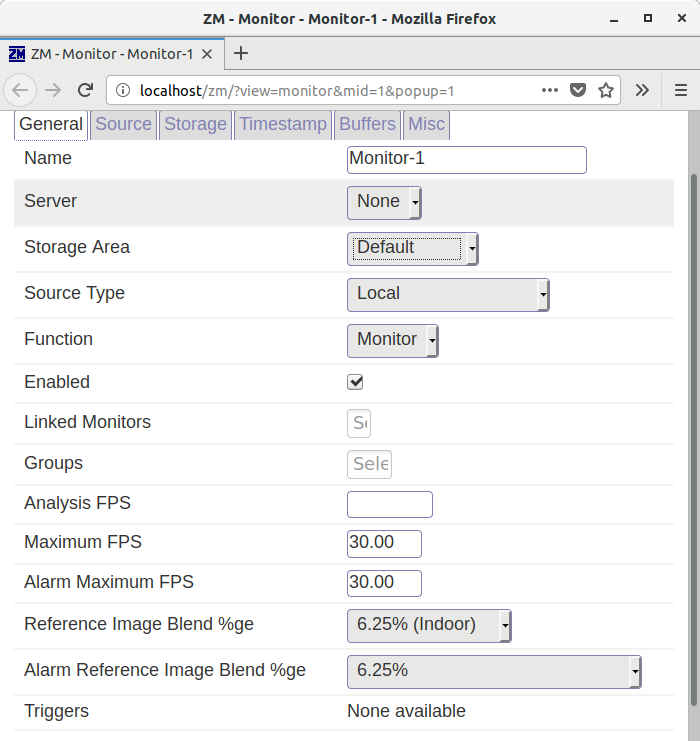 Adding a Monitor 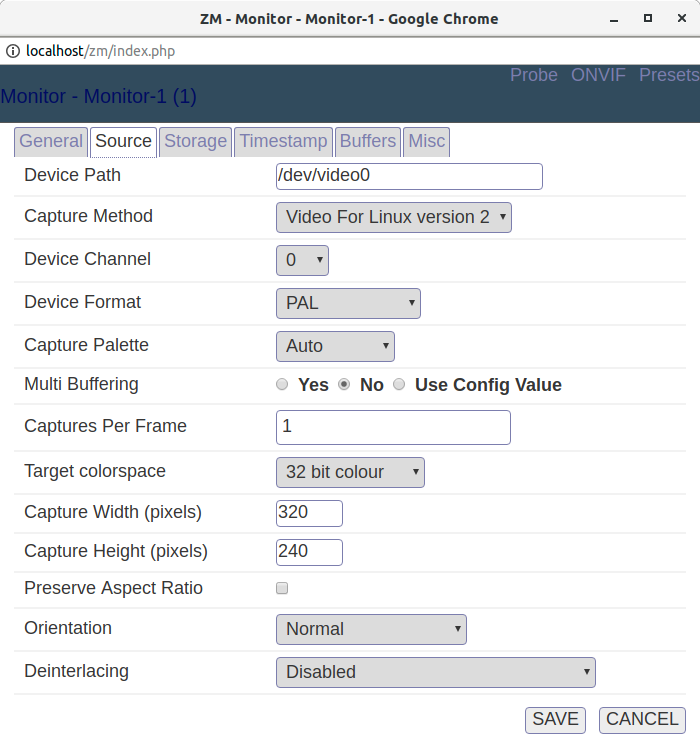 Adding a USB camera 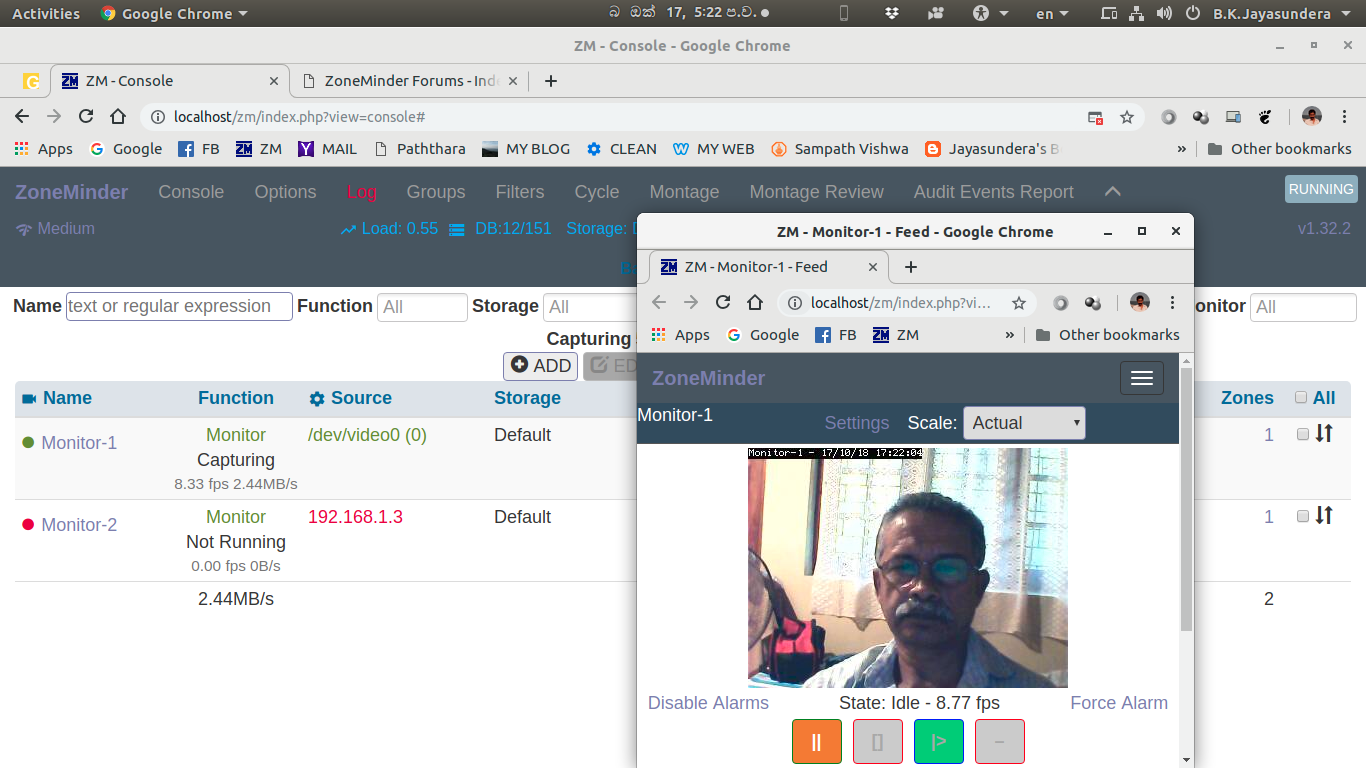 You can see the USB camera is working in the above figure For resolving dependency problems in Zoneminder (v1.32.2) on Ubuntu 18.10 (Cosmic) Please visit the link below How to solve dependency problems in Zoneminder (v1.32.2) on Ubuntu 18.10 (Cosmic) This post explains how to use a partition of a disk of a PC to store zoneminder events instead of saving on the computer ( At /var/cache/zoneminder/events). To enable to write data of zoneminder to the partition of the drive , It is necessary to mount the usb drive on the file system of the PC . For the installation details of Zoneminder please refer my earlier post First make a partition of the disk and formatted it to ext4 . For partitioning , It is easy to use GParted-LiveCD Ref https://gparted.org/download.php (You will have to download GParted live and write it to a cd )
After rebooting you will be able to see the partition using following methods Open the Ubuntu terminal ls -l /dev/disk/by-uuid 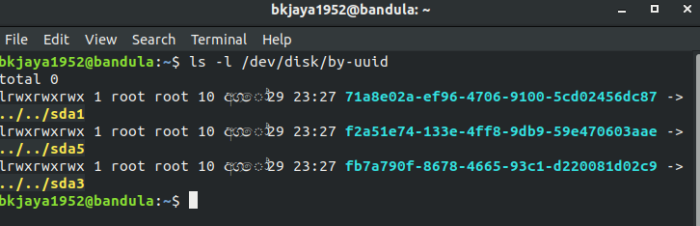 Figure 1 :-Getting details of disk using the Ubuntu terminal ( ls -l /dev/disk/by-uuid ) 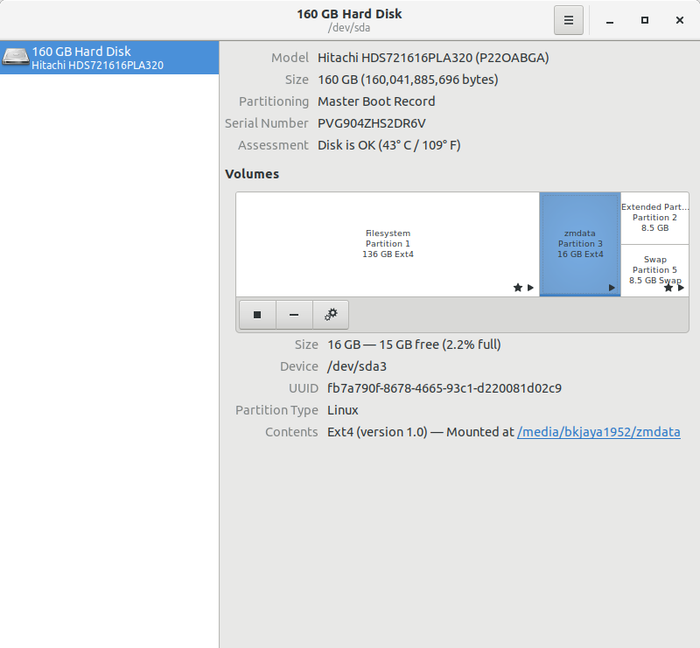 Figure 2:- Getting details of disk using gnome-disk-utility  Figure 3:-mounted disks. The sda3 was named as zmdata during the partitioning You can see the sda3 is mounted on /media/bkjaya1952/zmdata. But without mounting on the file system of the PC zoneminder will not be able to write data in to sda3. Therefore you will have to create a Systemd Mount Unit. Creating Systemd Mount UnitOpen the Ubuntu terminal sudo mkdir /mnt/sda3 sudo gedit /etc/systemd/system/mnt-sda3.mount and paste the following codes into mnt-sda3.mount and save (details of uuid of usb was taken from figure 1 and figure 2) 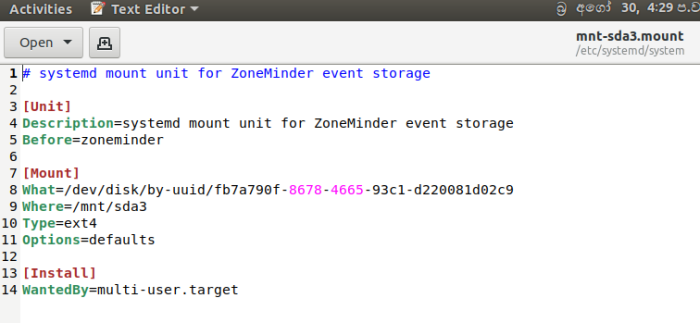 Figure 4:-Codes in mnt-sda3.mount sudo systemctl enable mnt-sda3.mount sudo systemctl start mnt-sda3.mount Then restart the computer Now if you see the folder /mnt/sda3 ,you can see that the disk partition is mounted on /mnt 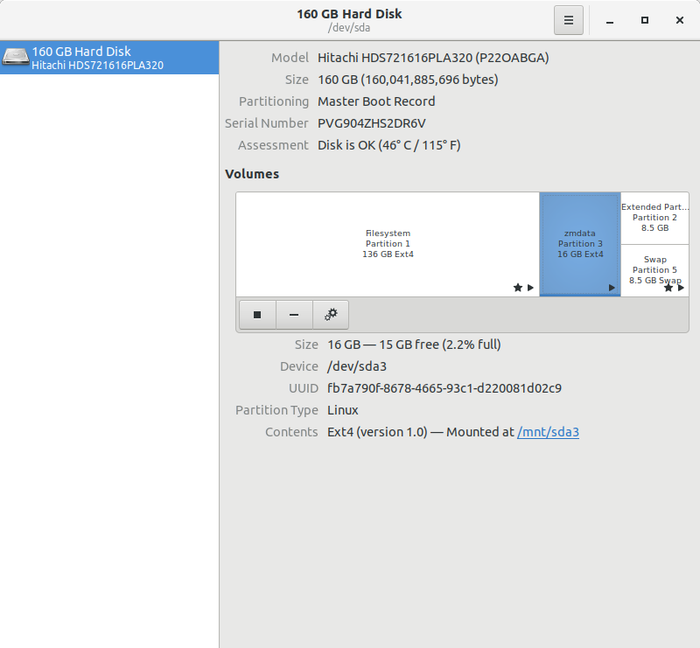 Figure 5:-The sda3 Partition is now mounted on the file system of the PC If you compare Figure 2 and Figure 5 You can see the sda3 is mounted on the file system now Create a folder called “zoneminder” on the mounted sda3. Then create folders “events” with in the folder “zoneminder” Open the ubuntu terminal cd /mnt/sda3 mkdir zoneminder cd zoneminder mkdir events sudo chown -R www-data:www-data /mnt/sda3/zoneminder sudo chown -R www-data:www-data /mnt/sda3/zoneminder/events 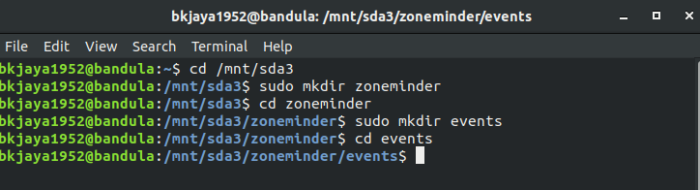 Figure 6:- Create a config file under /etc/zm/conf.d . Name the file anything you want just as long as it ends in “.conf”. Add the following content to the file and save your changes: (In my case I have used ajp.conf as the file name ) sudo gedit /etc/zm/conf.d/ajp.conf and pasted following codes and saved the file in /etc/zm/conf.d  Figure 7:- Open the ZM console and go to Options/Storage and add a NewStorage added Storage path as /mnt/sda3/zoneminder/events Please refer the following figure for the details 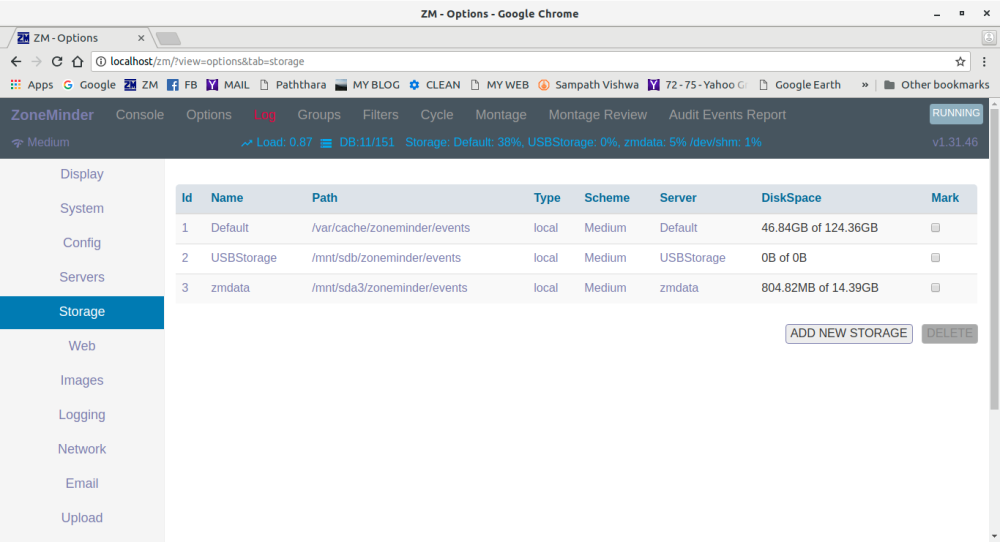 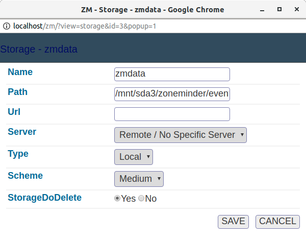 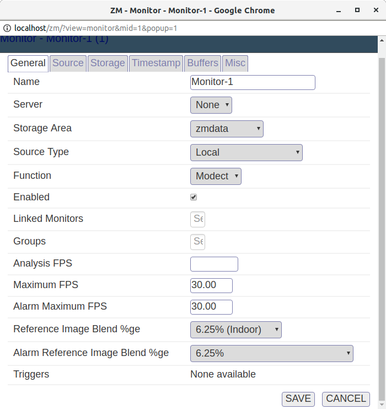 Figure 8:-Creating a New Storage for the Monitor Then enter following command on the Ubuntu terminal to start zoneminder. sudo systemctl start zoneminder 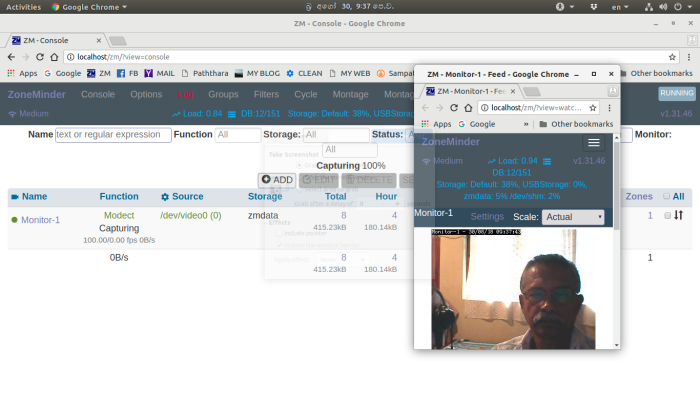 Figure 9:-ZM Console and the monitor 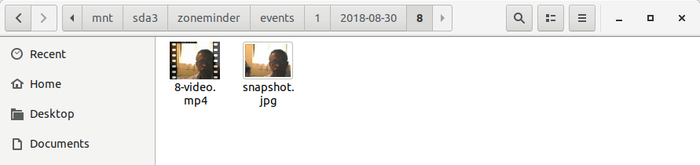 Figure 10:- Saved ZM events on the mounted disk partition ( At/mnt/sda3/zoneminder/events) Reference :- Zoneminder Official Installation Guide Andrew Bauer’s blog-page 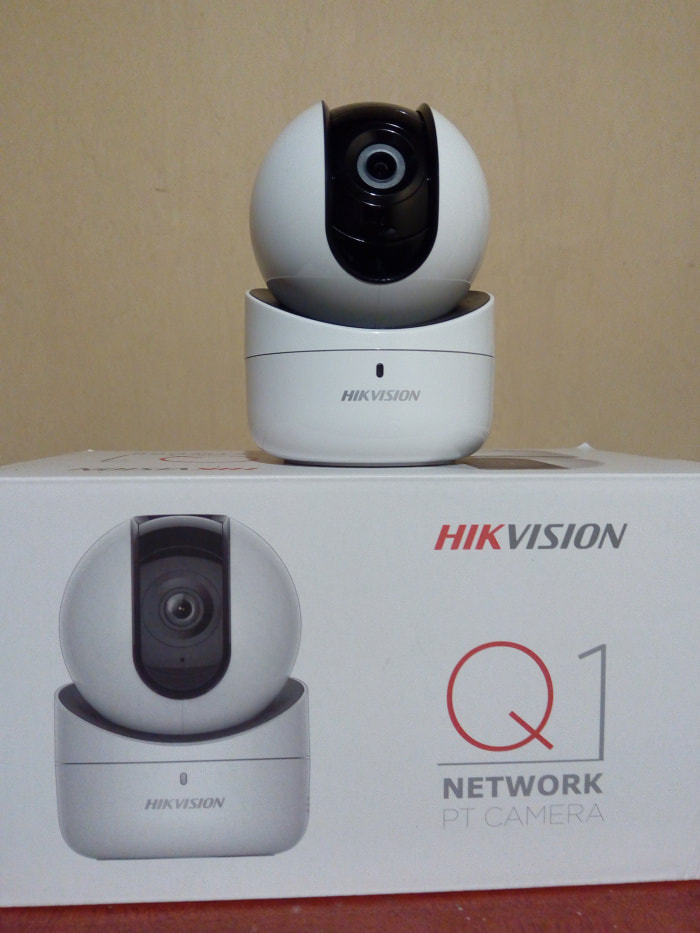
Figure1 :- Hikvision Q1 NETWORK PT CAMERA
I wanted to add my Hikvision Q1 NETWORK PT camera to Zoneminder .In Order to get RTSP stream we need the device username and password of the camera. Therefore I have gone through the user manual of the camera for searching the default device password .But the device password was not given in the brochure given with the camera. Then I had to export xml file with the SADP tool and send it to the Hikvision support center in Bangladesh to get the key to reset the password. The Hikvision support center has sent keys several times but failed to reset the device password using the SADP tool.Then I have asked them whether there is a default password of the above camera. But they informed me that there is no default password. Then I have searched the internet for the default password of Hikvision Q1 NETWORK PT CAMERA and finally found a comment made by a gentleman called marku2 in a blog ipcamtalk that gave a clue for the default device password of the camera. The default username and default password of Hikvision Q1 NETWORK PT CAMERA are as follows. Default username – admin Default password – admin(verification code on camera sticker) Note:- You will have to enter the verification code just after “admin” without ( ) 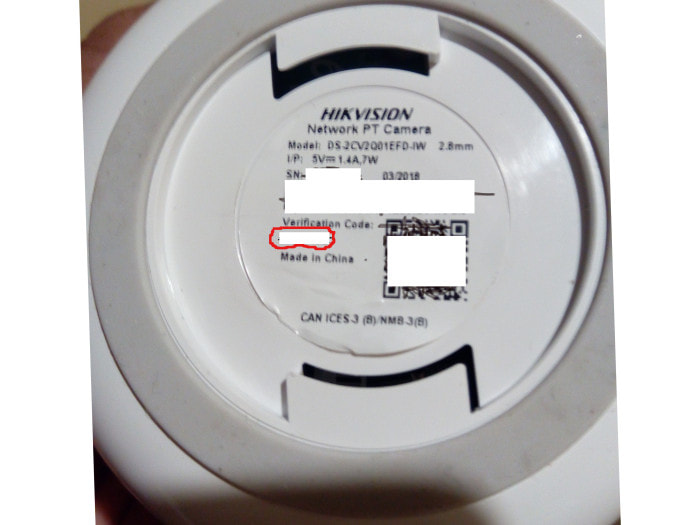
Figure 2 :- The verification code is circled with red .
The procedure I have used has following steps 1 . The camera is set to factory reset by pressing the reset button about 5 seconds . (When you rotate the camera to the fully upward position , you can see a small door on the front face of the camera . You can open the door with a small pin . After opening the door you will be able to see a small grove for the SD card .To the right of the grove you can see the small reset button.) Note:- Be careful to insert the SD card facing the metal pins in upward position in to the grove Once the the camera is set to factory reset, the device username and password automatically set in to default values. 2. Now you will have to use Hikvision ivms4200 software to change the default password. 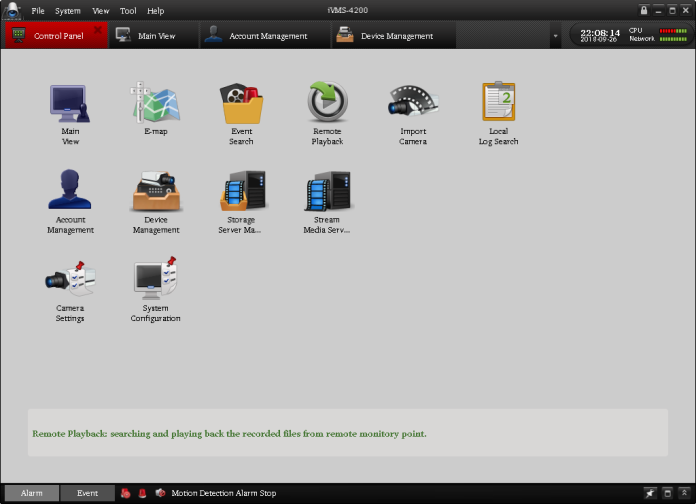
Figure 3 :-Control Panel of ivms4200
Press the device management button and add the camera. 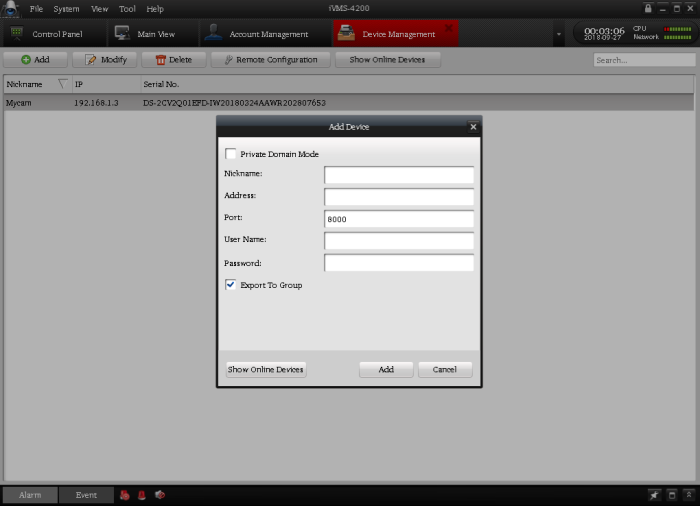
Figure 4 :-entering the IP address and Default username and password
Figure 5 :-Changing the default password using user button and modify button
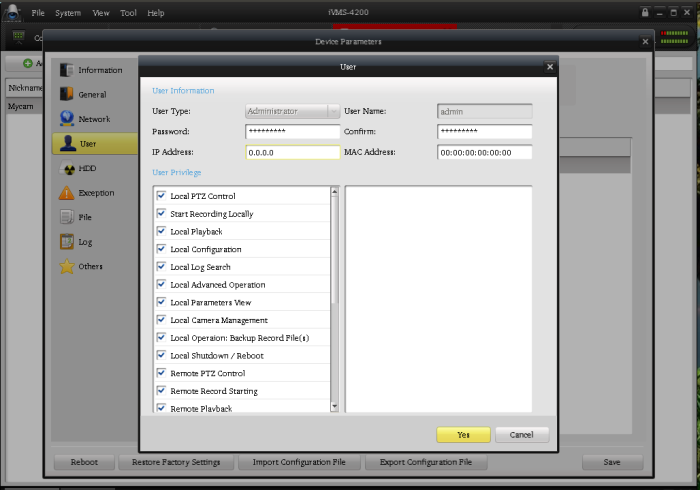
Figure 6:- Changing the device password
Changing the default password was successful. Then the camera was added to the Zoneminder monitor using the changed password . 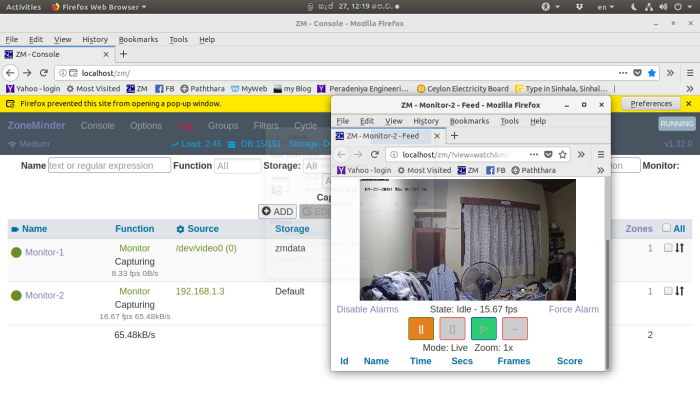
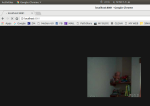
Figure 7:- Zoneminder view of the camera monitor
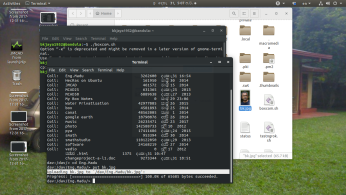
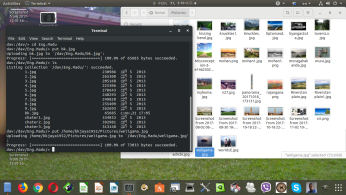
Our task is to find a method for linux operating systems to automatically upload zoneminder motion detection events to Box.com cloud storage. I have 3 monitors created on zoneminder and events are stored in 3 separate storage areas. The storage details are shown in the following figure. This blog post explains how to sync events of 3 ZM monitors with 3 folders in Box.com cloud storage.  Figure :-1 Box.com cloud service provides free 10 Gb storage for personal use. Box management has announced that they will deprecate support for WebDAV after Jan 31, 2019 .Therefore other alternatives have to be found to sync data in linux platforms with Box.com cloud service. The syncing facility is provided only for Microsoft Windows by Box.com. Git-annex is a very good open source software for linux operating systems to solve the above problem in syncing with Box.com cloud . How to install git-annex on Ubuntu 18.04 on the Ubuntu terminal sudo apt update sudo add-apt-repository ppa:kelleyk/git-annex sudo apt update sudo apt install git-annex In order to use events files in git-annex, the files at /var/cache/zoneminder/events , /mnt/sdb/zoneminder/events, and /mnt/sda3/zoneminder/events have to be given read and write permissions On the Ubuntu terminal sudo chown -R www-data:www-data /var/cache/zoneminder/events sudo chmod -R g+w /var/cache/zoneminder/events sudo chown -R www-data:www-data /mnt/sdb/zoneminder/events sudo chmod -R g+w /mnt/sdb/zoneminder/events sudo chown -R www-data:www-data /mnt/sda3/zoneminder/events sudo chmod -R g+w /mnt/sda3/zoneminder/events Connecting zoneminder events to dedicated drives Create a config file under /etc/zm/conf.d . Name the file anything you want just as long as it ends in “.conf”. Add the following content to the file and save your changes: (In my case I have used ajp.conf as the file name ) sudo gedit /etc/zm/conf.d/ajp.conf and pasted following codes and saved the file in /etc/zm/conf.d  After installing get a git-annex you will get a launcher icon on the computer When you double click on the launcher git-annex dashboard will appear on the web browser. Adding repository for /mnt/sdb/zoneminder/events (figure 2 to figure 8 ) 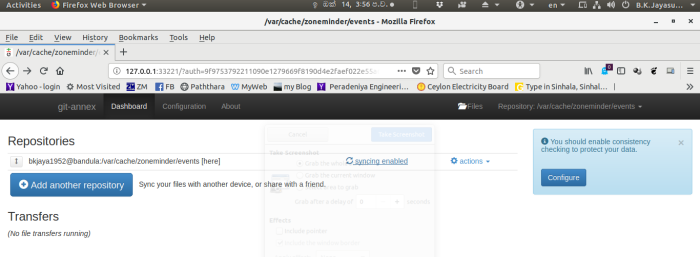 Figure :-2 Adding repository for /var/cache/zoneminder/events 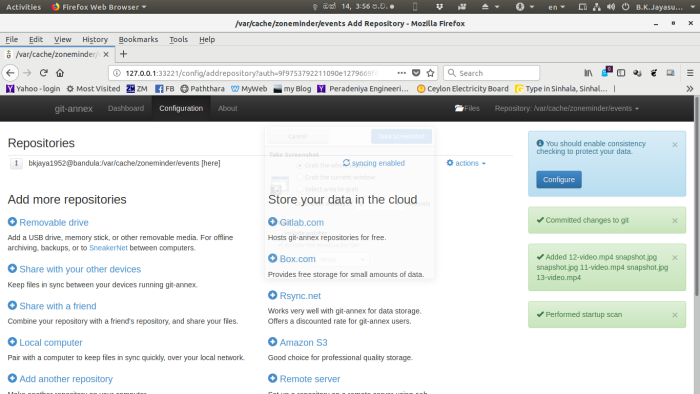 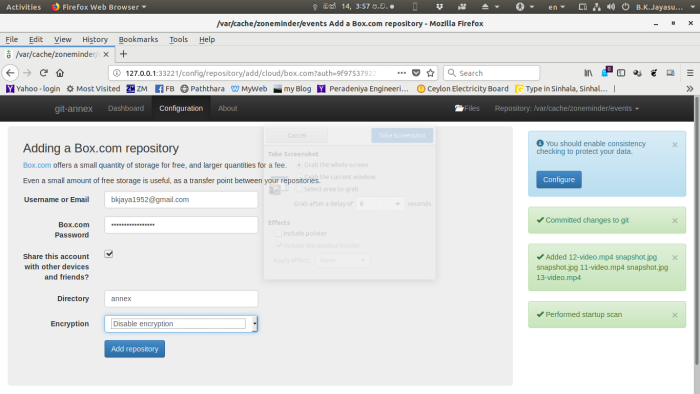 Figure :- 4 Adding login details for Box.com note :- Select encryption disable 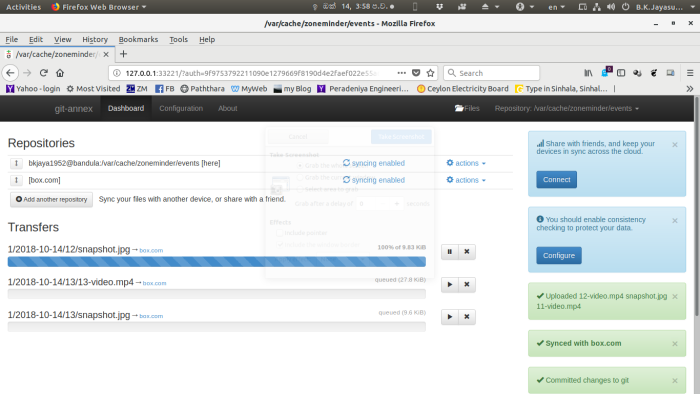 Figure :- 5 Automatically uploading events to Box.com  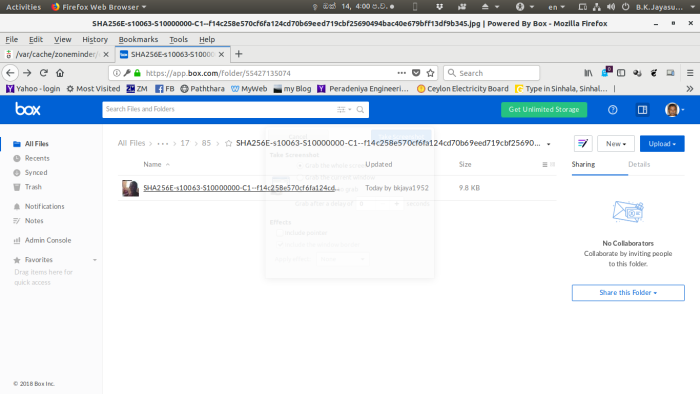 Figure :- 7 Uploaded files on annex folder in Box.com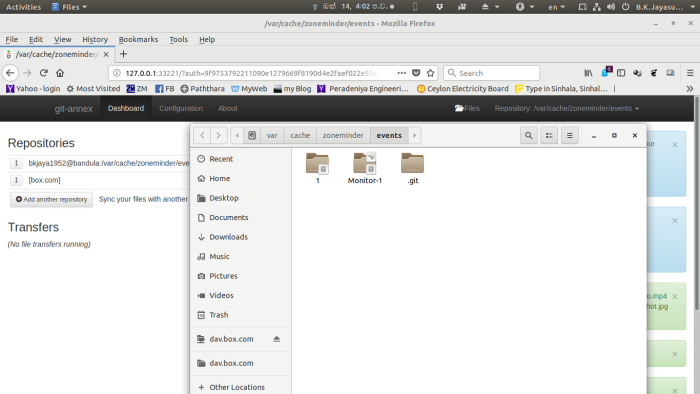 Figure :- 8 git-annex folder on git-annex console 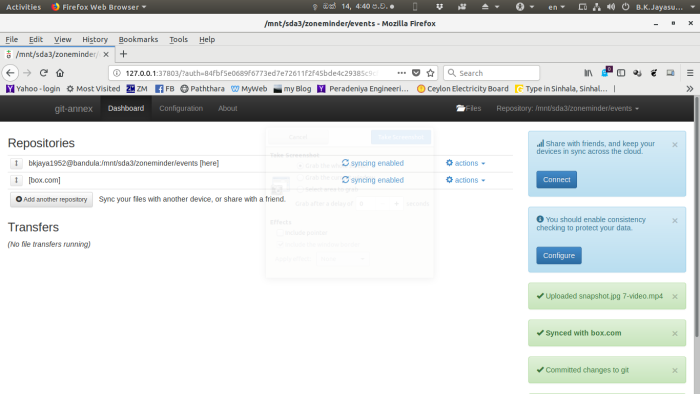 Figure :- 9 Adding repository for /mnt/sda3/zoneminder/events Adding repository for /mnt/sdb/zoneminder/events (Figure 10 to figure 6) 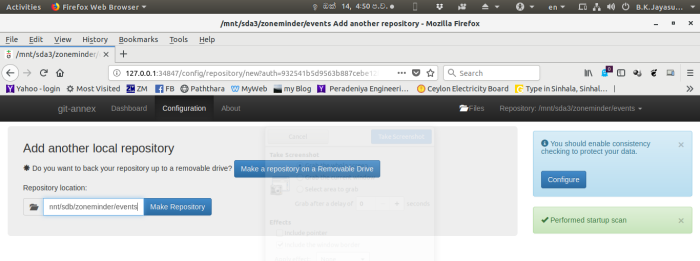 Figure :- 10 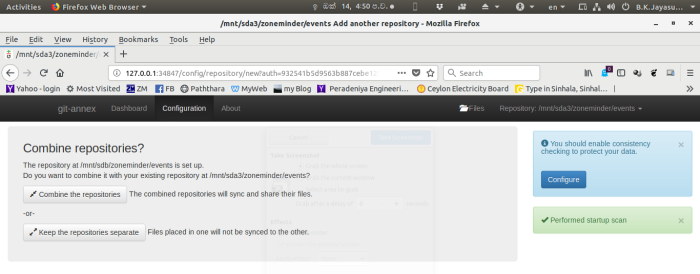 Figure :- 11 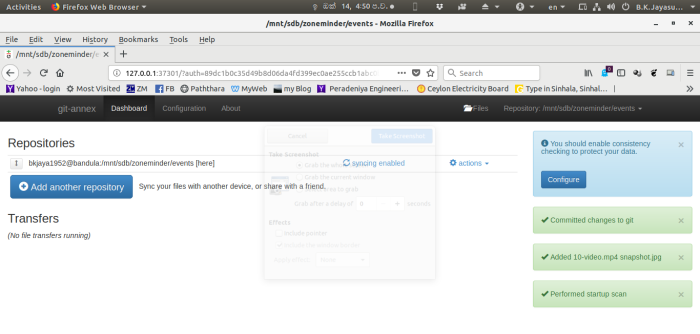 Figure :- 12 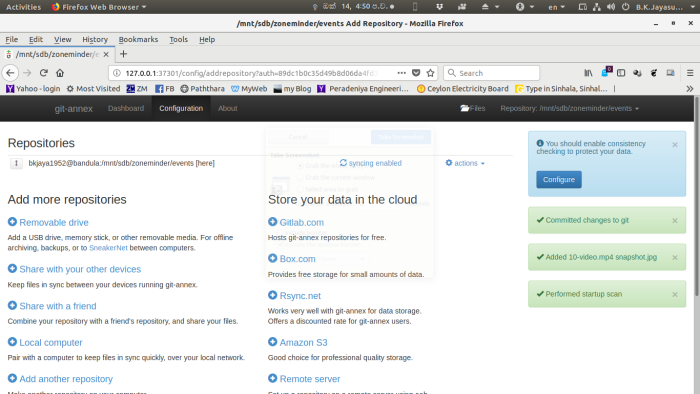 Figure :- 13 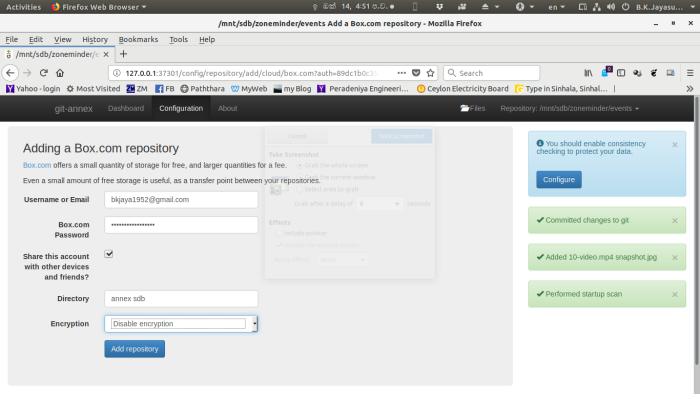 Figure :- 14 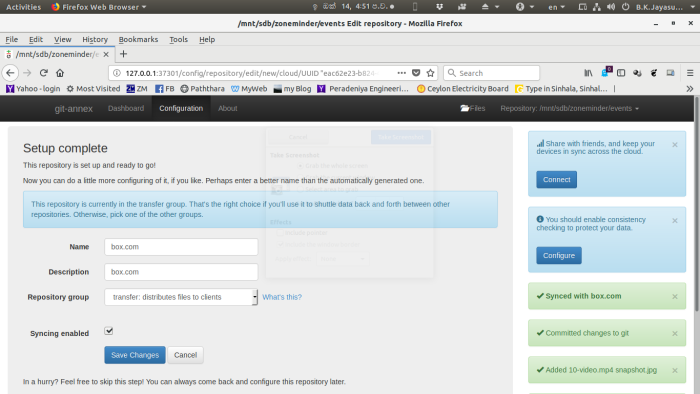 Figure :- 15 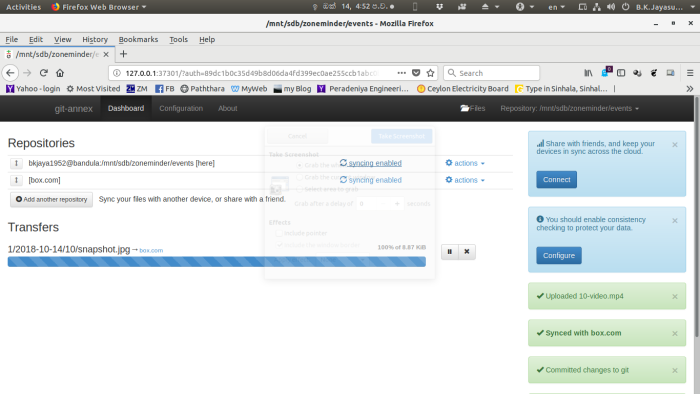 Figure :- 16  Figure :- 16 Uploaded events of 3 storage folders are underlined in red  Figure :- 17 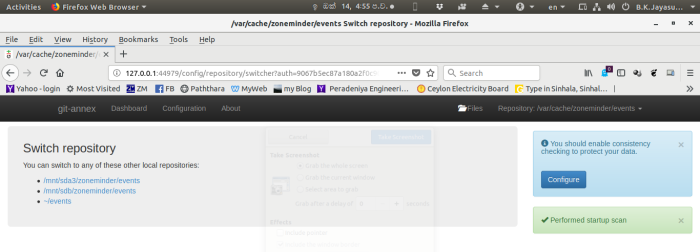 Figure :- 18 You can see 3 repositories on git-annex dashboard for 3 zoneminder monitors 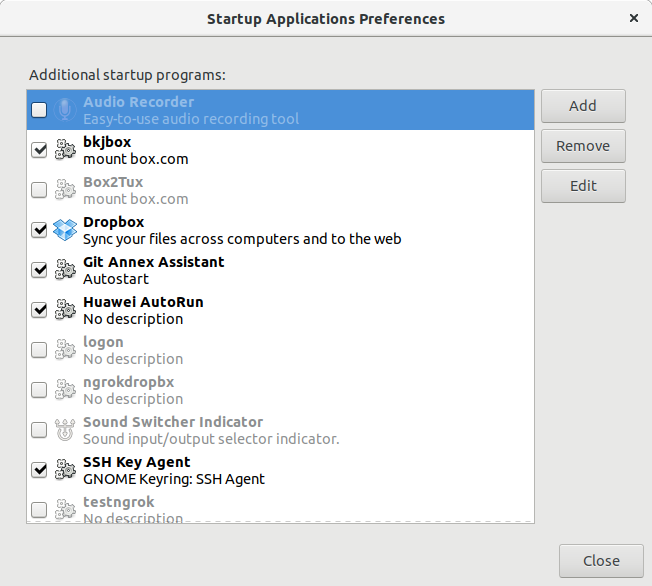 Figure :- 19 You can see in Figure :- 19 , the git-annex daemon will start at the boot time to facilitate automatic syncing |
AuthorRetired Director of Irrigation ,Sri Lanka Categories
All
Archives
March 2020
|


 RSS Feed
