How to use ssmtp mail transfer agent within a docker-zoneminder container on UIbuntu 19.1011/26/2019 In this tutorial we are going to use “Docker: Enterprise Container Platform” (docker.io) to install “quantumobject/docker-zoneminder” on Ubuntu 18.10 operating system. Then SSMTP (MTA) is installed within the Zoneminder container created using quantumobject/docker-zoneminder . The “quantumobject/docker-zoneminder which is based on zoneminder master packages has been maintained and uploaded to the Docker Hub by Angel Rodriguez-Rodiguez-Riccrdo. Installation procedure is given below. Installation of Docker on Ubuntu 19.10 Open the Ubuntu terminal and run sudo apt install docker.io We are going to run Zoneminder with MySQL in a separate container On the Ubuntu terminal sudo docker network create net ( I have used my timezone as Asia/Colombo . Your time zone can be get from here )The above commands will pull mysql/mysql-server:5.7 and create a container named “db” on the Docker Platform Then on the Ubuntu terminal sudo docker run -d -e TZ=Asia/Colombo -e MYSQL_USER=zmuser -e MYSQL_PASSWORD=zmpass -e MYSQL_DATABASE=zm -e MYSQL_ROOT_PASSWORD=mysqlpsswd -e MYSQL_ROOT_HOST=% --net net --name db mysql/mysql-server:5.7 The above commands will pull mysql/mysql-server:5.7 from docker hub and create a container named "db" sudo docker run -d --shm-size=4096m -e TZ=Asia/Colombo -e ZM_DB_HOST=db --net net --name zm -p 8085:80 --privileged=true quantumobject/docker-zoneminder The above commands will pull quantumobject/docker-zoneminder from the Docker Hub and create a container named “zm” (Here ,I have used port 8085 for the ZM panal ) ( You can notice “- -device=/dev/video0:/dev/video0” in above command which facilitate adding USB cameras on Zoneminder/Docker . You can use “- -privileged=true” also instead of “- -device=/dev/video0:/dev/video0”) In order to appear ZM panel , you will have to start above two containers “db” and “zm” using the terminal as follows. sudo docker start db zm Then open the web browser http://localhost:8085/zm/  Figure:- 1 zm console with USB camera Installation of SSMTP on ZM container Open the Ubuntu terminal and run sudo docker exec -t -i zm /bin/bash Then the following prompt will apear root@79ae35734aea:/# Now you are inside the ZM container Then enter following commands to install SSMTP within the ZM container apt update apt install ssmtp Now the SSMTP is installed wihin the ZM container. If you go to /etc/ssmtp/ you can see two ssmtp configuration files namely ssmtp.conf and revaliases You will have to edit above files to suit your email requirements . As the editing the files within the container is difficult, ssmtp.conf and revaliases are created wihin the host and copy in to the container . Let us create ssmtp.conf and revaliases files at the home folder of host Go to the home directory of the host and open the Ubuntu terminal sudo gedit ssmtp.conf Then enter the following scripts in the opened file and save root=youer [email protected] mailhub=smtp.gmail.com:587 hostname=localhost RewriteDomain=gmail.com UseSTARTTLS=YES UseTLS=YES AuthUser=youer [email protected] AuthPass=Your gmail password ---------------------------------------------------------------------------------------------------------------------- sudo gedit revaliases Then enter the following scripts in the opened file and save root:youer [email protected]:smtp.gmail.com:587 www-data:youer [email protected]:smtp.gmail.com:587 ---------------------------------------------------------------------------------------------------------------------- Now you will have to copy two files ssmtp.conf and revaliases in to the folder /etc/ssmtp/ of the ZM container using following commands on the Ubuntu terminal sudo docker cp ssmtp.conf zm:/etc/ssmtp/ssmtp.conf sudo docker cp revaliases zm:/etc/ssmtp/revaliases Now ZM container is ready for sending emails from localhost/zm Then the Email details have to be entered and save at ZM-Options/Email as shown in the following figure. Figure:- 2 Scripts in ssmtp.conf and revaliases files Figure:- 3 Entering email detalis The a ZM filter has to be created as shown in the following figure and execute to be able to send emails alerts to your email address. 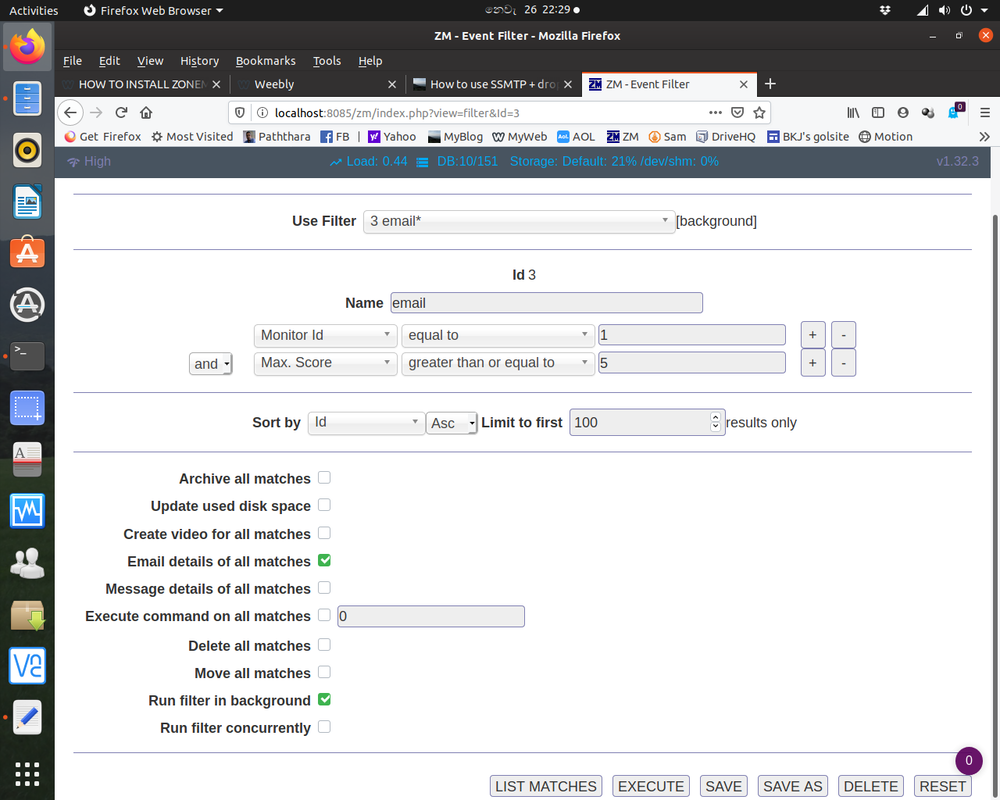 Figure:- 4 Filter created for sending email alaerts Figure:- 5 Email alerts on motion detection on Aol mail
0 Comments
There is a problem in installing Zoneminder on Ubuntu 19.10 , as there are no official zoneminder eoan ermine versions issued up to now. The other problem is the presently available Zoneminder versions are based on mysql 5.7 , libmysqlclient20 while The Ubuntu 19.10 uses mysql 8 , libmysqlclient21 by default. Therefore dependency issues crop up when you try to install Zoneminder. As mysql-server-8.0 makes some problems, I have decided to use mariadb-server-10.3 . To overcome dependency issues in installing Zoneminder, libmysqlclient20 has to be downloaded and installed manually before installing Zoneminder using GDebi Package Installer Please refer the following link to download libmysqlclient20 for Ubuntu Disco https://www.ubuntuupdates.org/package/core/disco/main/updates/libmysqlclient20 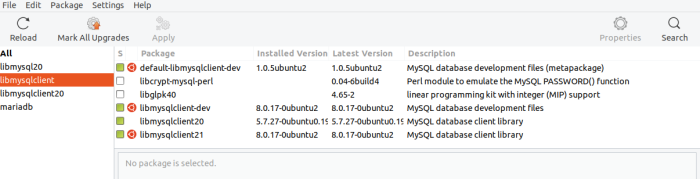 Figure:- 1 installed libmysqlclient20 is shown in the synaptic After installing the deb file libmysqlclient20, Install maridb-server-10.3 using synaptic package manager. Then the installed packages are shown as the following figure 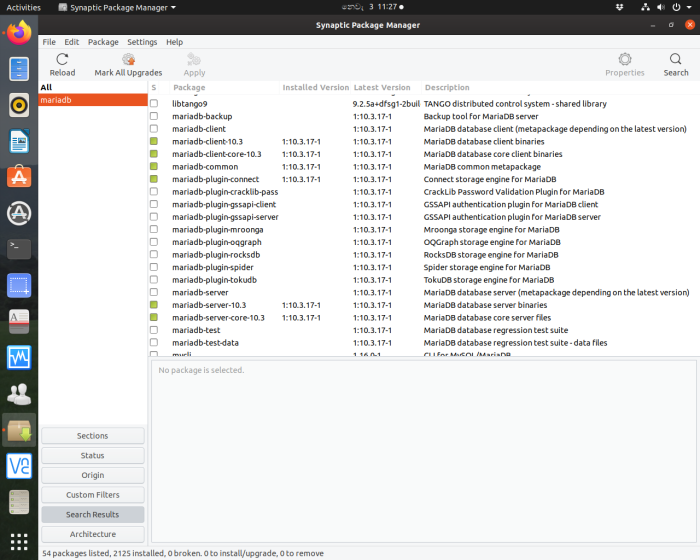 Figure:- 2 installed mairadb packages Mariadb installation Once mariadb-sever installed using the synaptc package manager , the mariadb-sever automatically starts. To check the states you can use one of the following 2 commands on the Ubuntu terminal systemtcl status mysql or systemtcl status mariadb If it is not running try sudo systemtcl start mariadb To enable auto start at boot time , run sudo systemtcl enable mariadb To secure mariadb sever run sudo_mysql_sequre_installation When the script ask you to enter password for root , you can enter your password for the server 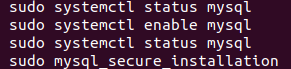 Figure:- 3 As the mariadb sever and the dependency software for zoneminder ,libmysqlclient20 are installed , now it is ready to install zoneminder . I have selected Zonminder master for installation. To install Zoneminder Please refer Connor’s web site Adding PPA to Ubuntu 19.10 (Eoan Ermine) is not possible as there is no official zoneminder version . Therefore the zoneminder deb file of ubuntu disco is downloaded and installed using GDebi Package Installer. Note:- As we have installed libmysqlclient20 , there won’t be dependency issue sudo su rm /etc/mysql/my.cnf cp /etc/mysql/mariadb.conf.d/50-server.cnf /etc/mysql/my.cnf gedit /etc/mysql/my.cnf add the following line below [mysqld] sql_mode = NO_ENGINE_SUBSTITUTION and save the file 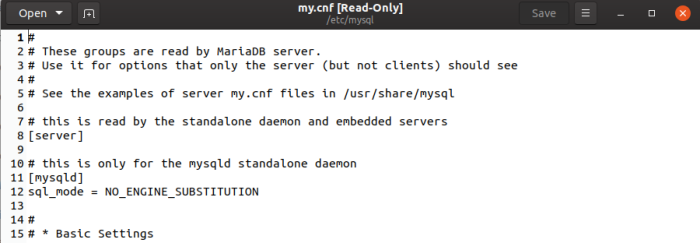 Figure:- 4 systemctl restart mysql mysql -uroot -p < /usr/share/zoneminder/db/zm_create.sql mysql -uroot -p -e "grant all on zm.* to 'zmuser'@localhost identified by 'zmpass';" (In above steps , when ask to enter the pass ,you will have to enter the root password of mysql) mysqladmin -uroot -p reload chmod 740 /etc/zm/zm.conf chown root:www-data /etc/zm/zm.conf adduser www-data video a2enmod cgi a2enconf zoneminder a2enmod rewrite chown -R www-data:www-data /usr/share/zoneminder/ systemctl enable zoneminder service zoneminder start To add timezone to PHP gedit /etc/php/7.3/apache2/php.ini edit line 956 with your timezone 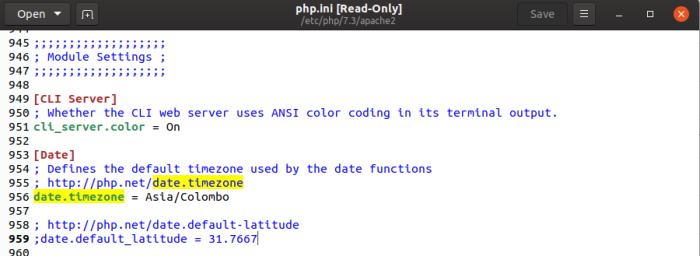 Figure:- 5 php.ini after adding timezone 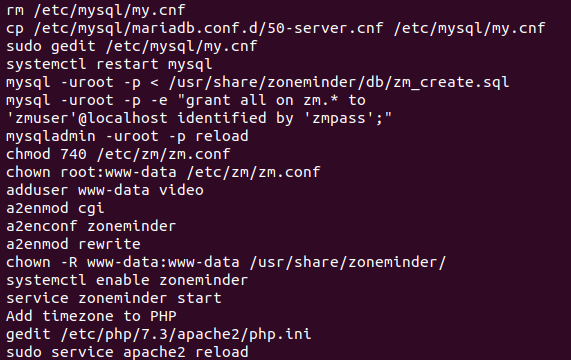 Figure:-6 Then save the file php.ini Your time zone can be get from here Then run on the Ubuntu terminal service apache2 reload Optional …..You can run zonemider without cambozola. Adding cambozola.jar to the directory /usr/share/zoneminder/www/ Download the latest cambozola and extract to the Downloads directory of your PC Then copy the cambozola.jar to the directory /usr/share/zoneminder/www/ On the ubuntu terminal run sudo cp /home/bkjaya1952/Downloads/cambozola-latest/cambozola-0.936/dist/cambozola.jar /usr/share/zoneminder/www/ Open zoneminder web console (http://localhost/zm/) Now you can add your camera to using the ZM-Console Following figures shows the status after adding the USB camera 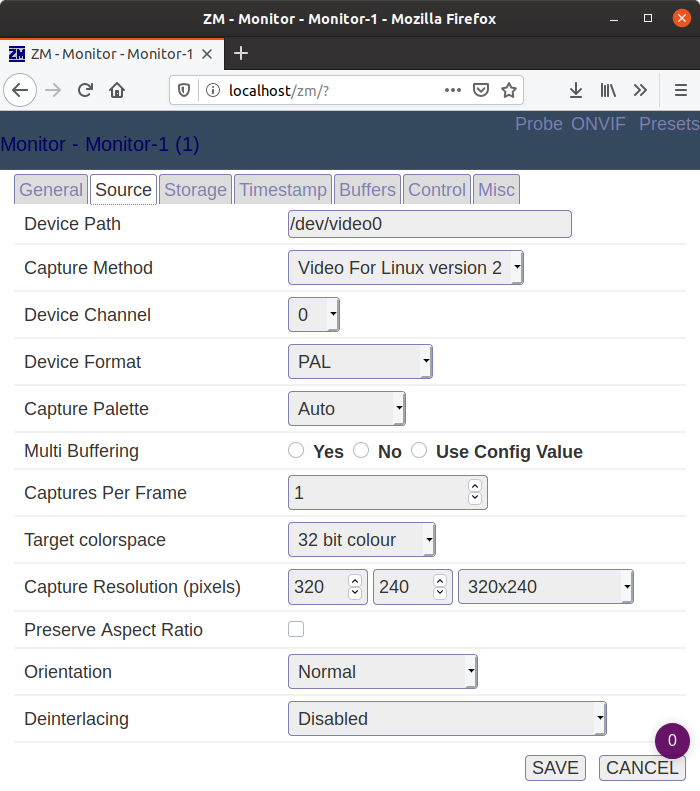 Figure:- 7 Adding usb camera to the monitor 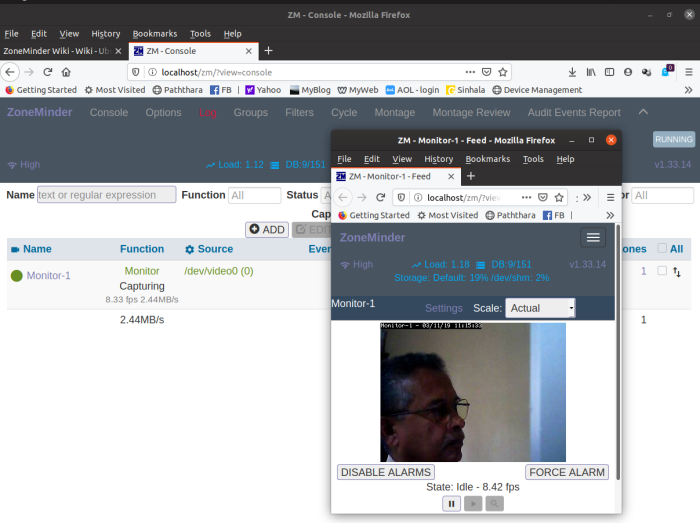 Figure:-8 ZM-Console & ZM-Monitor
To avoid errors pertain to Time , you will have to re enter the TIMEZONE in ZM as follows. In the ZM-Console , go to Options/System/TIMEZONE and select your date.timezone entered in the php.ini file at /etc/php/7.3/apache2/ previously . Then save the setting. |
AuthorRetired Director of Irrigation ,Sri Lanka Categories
All
Archives
March 2020
|
 RSS Feed
