How to use a USB Drive as a Dedicated Drive for ZoneMinder, v1.32.2. on Ubuntu 18.04 LTS Computer10/18/2018 This post explains how to use a usb drive attached to a PC to store zoneminder events instead of saving on the computer ( At /var/cache/zoneminder/events). Saving of zoneminder events on a dedicated drive is facilitated on the latest zoneminder versions to avoid the disk of the PC is getting filled with videos and images. To enable to write data of zoneminder to the usb drive , It is necessary to mount the usb drive on a folder of the PC . Please refer the link1 and link2 for further details. For the installation details of Zoneminder please refer my earlier post First insert the usb drive to the computer .Then get the details of USB using the following procedure Format the usb drive to ext4 using gnome-disk-utility Then open the Ubuntu terminal ls -l /dev/disk/by-uuid  figure 1:- Getting details of USB using the Ubuntu terminal ( ls -l /dev/disk/by-uuid ) 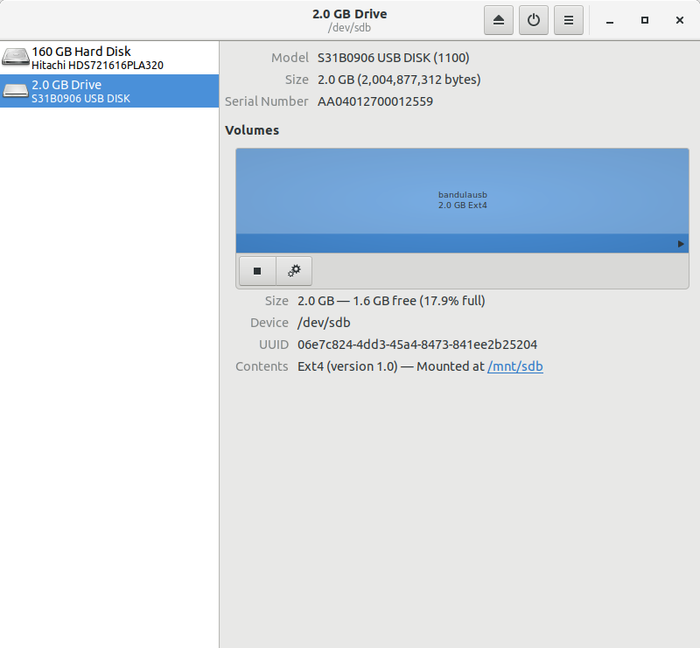 figure 2:- Getting details of USB using gnome-disk-utility Creating Systemd Mount UnitOpen the Ubuntu terminal sudo mkdir /mnt/sdb sudo gedit /etc/systemd/system/mnt-sdb.mount and paste the following codes into mnt-sdb.mount and save (details of uuid of usb was taken from figure 1 and figure 2) 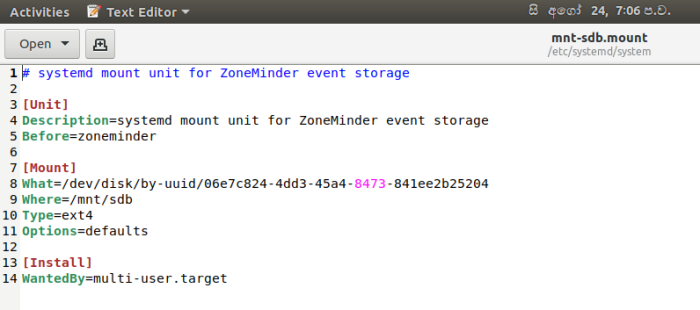 Figure 3:-Codes in mnt-sdb.mount sudo systemctl enable mnt-sdb.mount sudo systemctl start mnt-sdb.mount Then restart the computer Now if you see the folder /mnt/sdb ,you can see that the usb drive is mounted on /mnt Create a folder called “zoneminder” on the mounted usb. Then create folders “events” and “images” with in the folder “zoneminder” Open the ubuntu terminal cd /mnt/sdb mkdir zoneminder cd zoneminder mkdir events mkdir images sudo chown -R www-data:www-data /mnt/sdb/zoneminder sudo chown -R www-data:www-data /mnt/sdb/zoneminder/events
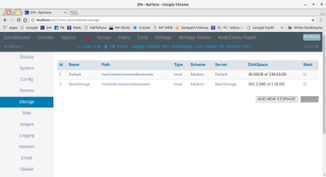
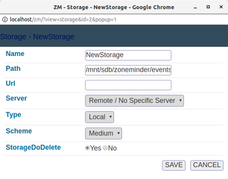
Figure 4:-After setting the owner and group to that of the web server user account Create a config file under /etc/zm/conf.d . Name the file anything you want just as long as it ends in “.conf”. Add the following content to the file and save your changes: (In my case I have used bkj.conf as the file name ) sudo gedit /etc/zm/conf.d/bkj.conf and pasted following codes and saved the file in /etc/zm/conf.d 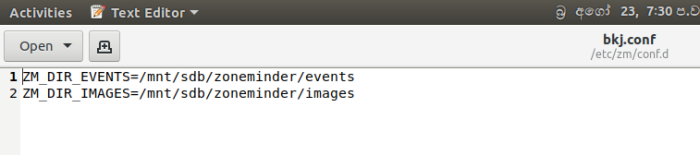 Figure 5:- Open the ZM console and go to Options/Storage and add a NewStorage added Storage path as /mnt/sdb/zoneminder/events Please refer the following figure for the details
Figure 6:-Creating a New Storage for the Monitor sudo systemctl start zoneminder 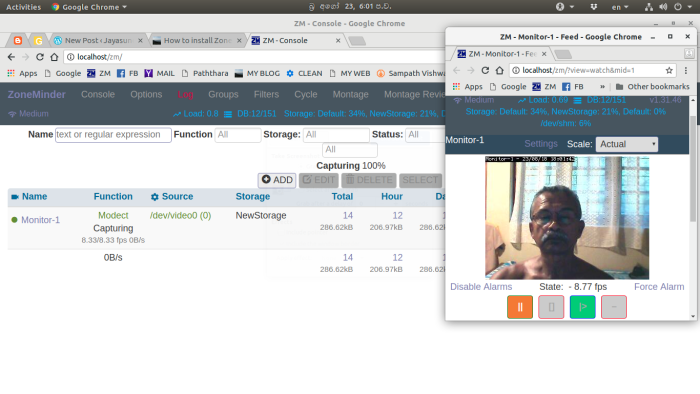 Figure 7:-ZM Console and the monitor 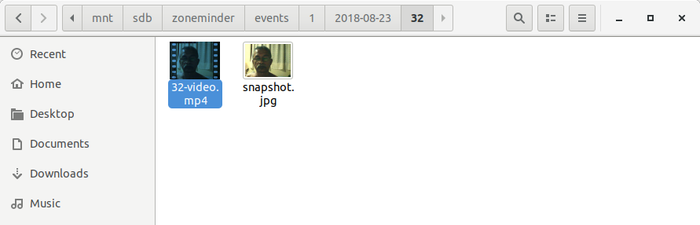 Figure 8:- Saved ZM events on the mounted USB drive
0 Comments
Leave a Reply. |
AuthorRetired Director of Irrigation ,Sri Lanka Categories
All
Archives
March 2020
|

 RSS Feed
